Page 1 of 1

PostPosted: Fri Dec 01, 2006 12:21 am
by D'eux
Hi Builders

I have successfully made a skydome for my own Age, but I get some pinching of the texturing at the zenith. I was wondering how the sky was put together for Arha Parts because it has the feeling of being massive and an all-encompassing.

Could someone briefly explain how it was done? Was it the EnvMap facility in Blender?

Thanks,

-: D'eux :-

PostPosted: Fri Dec 01, 2006 11:22 am
by Aloys
Thanks for the nice comments but hmm.. actually I've been lazy for the sky in Ahra. :) I tried doing it various ways but couldn't get it quite right, so I ended up doing one very large circular texture and mapped it flat on a simple dome.

Image

This isn't a very 'good' solution because the texture I had to do is very large (1024x1024 pixels) and because the sky dome is round the corners of the texture are 'wasted texture space' because they aren't used.. (This doesn't really matter though because the sky for this Age will have to be redone in the future..)

The 'pinching' effect you have at the center of the sky comes probably from the texture you use. If you use a texture and map it with a 'spherical' or cylindrical mapping, you have to edit your texture to make sure that all the top of the texture can be pinched with no visible problems. (Because the sky texture in Arha is mapped 'flat' there is no pinching issue)

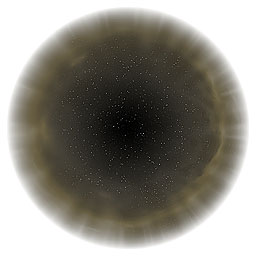
To do this there are several solutions, but the easiest one is to apply a simple color gradient with the brush on all the top. For example if I use this sky texture, it will look bad in the center once 'rolled up'.

Image

--> Image Bad.

But if you add a simple gradient it's much better.

Image See the blue gradient at the top?

--> Image Not perfect but better.

There are several other longer way to do skys, but that would deserve a whole tutorial... (In fact the skies in the Uru Ages use a number of different techniques.)

PostPosted: Fri Dec 01, 2006 1:38 pm
by Mystified Explorer
I use the circle texture for my ages, but then again I need to revamp my sky somewhat- it doesn't quite work atm.

PostPosted: Fri Dec 01, 2006 1:58 pm
by D'eux
Aloys,

Thank you for the comprehensive explanation and associated images... understand perfectly where you're coming from. I'll apply the top gradient to my skydome texture and see if I can alleviate the 'pinching'.

Cheers,

-: D'eux :-

PostPosted: Tue Dec 05, 2006 5:09 pm
by Robert The Rebuilder
Aloys: you're right; this would make a wonderful tutorial. Already this is excellent information.

In lieu of a full-up tutorial, perhaps you could tell us what Photoshop function you used to make it circular?

PostPosted: Tue Dec 05, 2006 7:25 pm
by Aloys
Filters > Distort > Polar coordinates.
This is irreplacable for this kind of work.
One very usefull thing with that filter is that you can use it 'both ways'. It you can make a square image circular, and a circular image back to being square (with an inevitable loss of quality). So a better solution that the simple gradient trick I described above is to distort your image to have it 'circular', edit however you want the middle part (paint, use the clone tool etc) to make it look right and then distort it again to be back to a regular square (or rectangular) shape. That way you are sure that the middle of your sky will look good.
This a short summary, but that's the idea.

It should be quite fast to do a tutorial for that (also it's not strictly Blender/PyPRP related); I'll try to get that done one of these days.

PostPosted: Tue Dec 05, 2006 8:06 pm
by Robert The Rebuilder
Thanks, Aloys!