Custom Lightmap?

If you feel like you're up to the challenge of building your own Ages in Blender or 3ds Max, this is the place for you!

Custom Lightmap?

Postby Lehm » Fri Nov 04, 2011 10:16 pm

I just followed Andy's tutorial on generating lightmaps. Plasma's built in generator seemed to work okay, but I was thinking I could create a better lightmap on own. Is there a way use your own lightmap? I thought about just specifying it in the material, but couldn't find a way to blend it in properly.
Lehm
 
Posts: 50
Joined: Fri Sep 28, 2007 11:12 pm

Re: Custom Lightmap?

Postby Christopher » Sat Nov 05, 2011 1:14 pm

I think you have to put your lightmap-texture in the Toplayer and you Basetexture in the Baselayer. For Layerblending I would use Multiply. I don't tried it, but I think this should work.
User avatar
Christopher
 
Posts: 276
Joined: Mon Jul 19, 2010 3:25 am

Re: Custom Lightmap?

Postby Lehm » Sat Nov 05, 2011 1:31 pm

Sorry should have been more specific. Forgot to mention I'm using a composite. You can use multiple on the first/base layer. If you attempt to use it on the second layer it errors. However Plasma's built in light map generator can correctly be applied to a plasma composite material. There has to be some way to get it to use a custom lightmap. I suppose the first question to ask is what is the generator doing? Is it modifying the material or something else? I wonder if it'd be possible in the generator rollout to be able to specify a map to use, rather than have it create a new one.
Lehm
 
Posts: 50
Joined: Fri Sep 28, 2007 11:12 pm

Re: Custom Lightmap?

Postby Paradox » Sat Nov 05, 2011 2:03 pm

Plasma lightmaps are a special type of layer that's blended using special flags after all other layers. Unfortunately I don't know if there's a way to specify your own lightmap image through Max, but it looks like Cyan hand-painted some of their lightmaps, so it should be possible.

Have you tried exporting with lightmaps turned on, then editing the lightmap image, then exporting with lightmaps turned off? PlasmaMax might pick up the new image.
Paradox
 
Posts: 1295
Joined: Fri Sep 28, 2007 6:48 pm
Location: Canada

Re: Custom Lightmap?

Postby Lehm » Sat Nov 05, 2011 4:12 pm

Paradox wrote:Plasma lightmaps are a special type of layer that's blended using special flags after all other layers. Unfortunately I don't know if there's a way to specify your own lightmap image through Max, but it looks like Cyan hand-painted some of their lightmaps, so it should be possible.

Have you tried exporting with lightmaps turned on, then editing the lightmap image, then exporting with lightmaps turned off? PlasmaMax might pick up the new image.


Ah so this special layer is something that we don't have access to currently through the material editor? Wonder how hard it would be to add it to the editor. Another way to possibly specify it would be to add a bitmap slot to the plLightMapComponent, then when the MakeMaps function is called it would simply copy that bitmap instead of actually generating one.

As for your idea...how do you edit the lightmap image after export...it would be in the texture prp file and I have no idea how those work.
Lehm
 
Posts: 50
Joined: Fri Sep 28, 2007 11:12 pm

Re: Custom Lightmap?

Postby andylegate » Sat Nov 05, 2011 4:19 pm

Before Cyan came out with their plugin, using Blender and the PyPRP plugin, we had to "bake" our own lightmaps. You did this by basically creating the lightmap texture with Blender itself, then turn around and use it as a layer in your material.

You can do the same thing in Max; Render your scene to produce the light map that you desire. Here is a link to a tutorial on how to do that (but I've never used it, and not sure what version of Max it is for, still the basic idea should be the same):

http://www.battlefieldsingleplayer.com/ ... torial.htm

As for how to apply after you've made your texture:

You can do exactly what you were saying: Use Plasma Composite. The KEY thing to remember, is that the UV channel for that lightmap has to be different from your UV channels for your textures. To make the light map on your object, you should have created a special UV channel for it, and unwrapped the object by using "Flatten" as your unwrap method. This makes sure all the faces of the object are contained within the size of your texture (You can't tile lightmaps).

Wish I could give you more detailed info, but I"ve always relied on Cyan's plugin for the lightmaps I needed and they always looked fine for me (inside scenes. Outside scenes require either vertex painting or shadow decals, which is like a light map)).
"I'm still trying to find the plKey for Crud!"
Image
Blender Age Creation Tutorials
3DS Max Age Creation Tutorials
User avatar
andylegate
 
Posts: 2348
Joined: Mon Oct 01, 2007 7:47 am

Re: Custom Lightmap?

Postby Lehm » Sat Nov 05, 2011 4:38 pm

Creating my own lightmaps with proper uv's is easy....I've been using 3ds for about 10 years. I just don't see a way to blend it in properly using the composite material.

I played with the built in generator. But the output wasn't very good IMO. For one there were black edges along all the uv seems, most likely caused by improper padding. Plus it was pretty basic in the output. If you use the render to texture you can get things like Global Illumination in the export. So I'd much rather create my own...the output I'm getting just looks much more realistic.
Lehm
 
Posts: 50
Joined: Fri Sep 28, 2007 11:12 pm

Re: Custom Lightmap?

Postby andylegate » Sun Nov 06, 2011 5:11 am

Well you do have a third option for your shadows: Make a Shadow Decal then.

Create a separate mesh and apply your shadow texture to it.This was done in a lot of Uru Ages: The volcano shadow, and barb wire fence shadow in the Cleft are good examples of this being done. Since the shadow texture is the only one being applied to that mesh, you'll have a LOT more control over it than as a layer of some other material applied to what the shadow is on (like in Kemo, the shadow decals are animated in opacity, to appear when the rain starts and the lights come on).

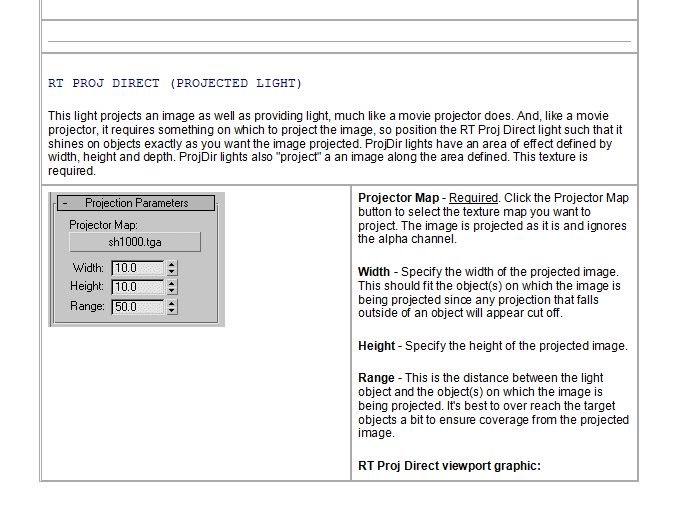
Also, I don't know what you are trying to have cast a shadow, but if it's a complex shadow, like a tree or a chain link fence outside, consider using a Projection Light instead. I'm afraid I have not written a tutorial on how to do that in Max, but their is one for Blender http://www.guildofwriters.org/wiki/ProjectionLights And it might help you understand how to do it in Max.

EDIT: Ah, here is the info on Projection Lights from the Plasma Docs for Max:
Image

Image

The cool thing about projection lights, is you can use it for more than just shadows. Let's say you have a lamp model with a colorful lamp shade. You can use projection lights to make it look like the lamp shade is projecting that color in your room on the floors, walls and objects. If you look closely in the picture below, you can see where I was messing around with it to do that. The light glob uses a rainbow like texture, and some of that is being cast on the desk, and on the wall to the left:

Image

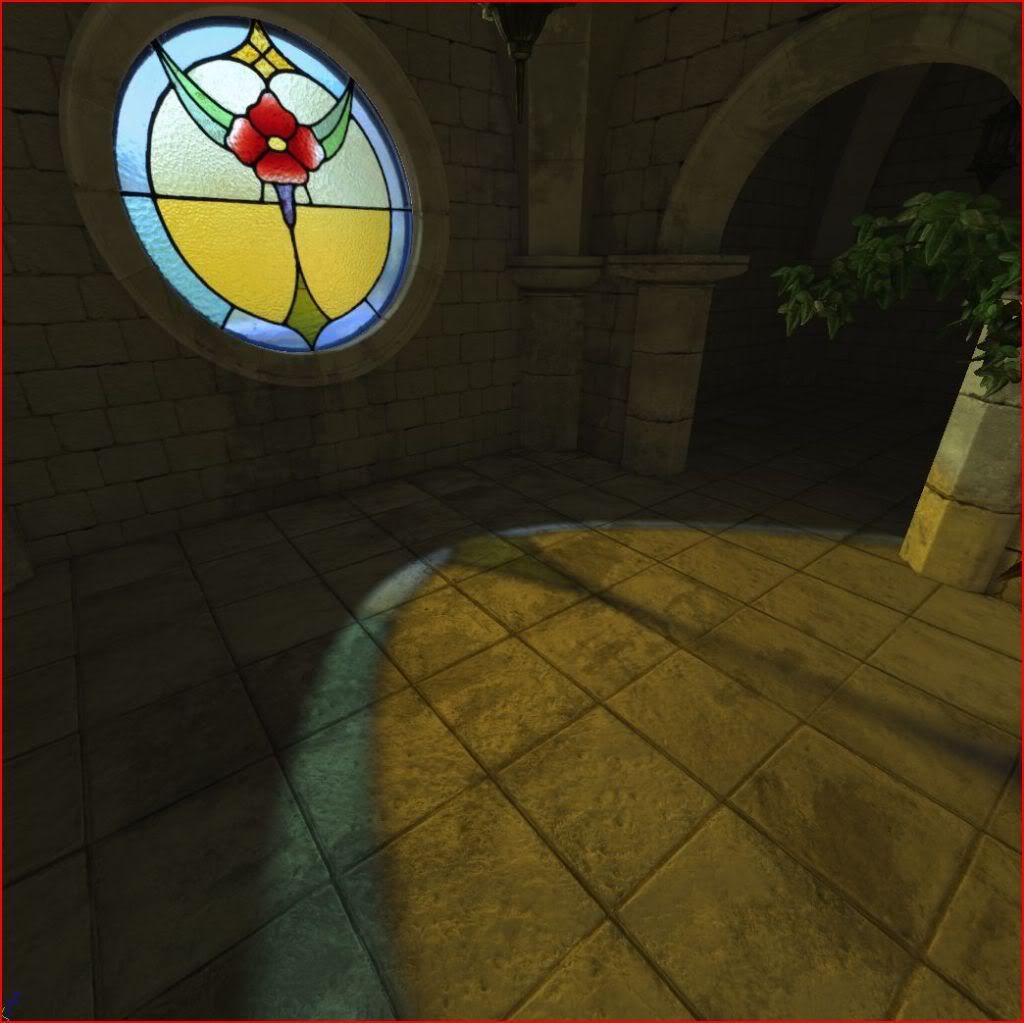
If you do it really well, you can have some awesome looking "Translucent Shadows":
Image
"I'm still trying to find the plKey for Crud!"
Image
Blender Age Creation Tutorials
3DS Max Age Creation Tutorials
User avatar
andylegate
 
Posts: 2348
Joined: Mon Oct 01, 2007 7:47 am

Re: Custom Lightmap?

Postby Lehm » Sun Nov 06, 2011 8:36 am

Good info to have.

What I'm attempting to lightmap is my terrain. Since there doesn't appear to be a way to do what I want at the moment I've decided to compromise. Only using the lightmap for the ground and the walls will have standard vertex shading. Screenshot of result. Comes out pretty well...but the blob like shadows on the wall bother me a bit, but they'll do for now.
lehmfirstage_01.jpg
lehmfirstage_01.jpg (536.4 KiB) Viewed 5267 times
Lehm
 
Posts: 50
Joined: Fri Sep 28, 2007 11:12 pm

Re: Custom Lightmap?

Postby andylegate » Sun Nov 06, 2011 9:53 am

Hrmmmmm. Looking at your picture, I would have to say your best bet would be to use a shadow decal. Make a mesh that fits the floor and curves up the face of the cliff, and use a baked shadow texture on it. That's what I love about the new SDK's is you don't have to do that and they lightmap just fine automatically with the new lighting system.

BUT, doing it the old way (Legacy is what they call it), in some ways can be better, because you have a bit more control and it forces you to learn more, I'll admit that. I also freely admit that by learning how to do things the "old school" way like making Ages in Plasma, makes me appriciate how easy things are now a days in the newer engines. Those that complain that it's "too hard" make me laugh quite hard, hehehehe, they have NO idea how "hard" things used to be! :lol:

Anyways, that's what I would try to do here: Shadow Decal. Lightmaps, for me anyways, I've always reserved for inside scense (buildings, caves, etc), while outside I've depended on Decals (vertex painting only works if you don't care how defined the shadow is, as the only way to make it very detailed is to increase the amount of verticies you have in that area, and increasing it too much will then cause other problems.).
"I'm still trying to find the plKey for Crud!"
Image
Blender Age Creation Tutorials
3DS Max Age Creation Tutorials
User avatar
andylegate
 
Posts: 2348
Joined: Mon Oct 01, 2007 7:47 am


Return to Building

Who is online

Users browsing this forum: No registered users and 3 guests

cron