Occluders don't work, or do they

If you feel like you're up to the challenge of building your own Ages in Blender or 3ds Max, this is the place for you!

Occluders don't work, or do they

Postby melvin » Tue Dec 26, 2023 8:41 am

Question...does anyone know anything about OCCLUDER Meshes & how they work. There is no tutorial on the subject & according to the Guild of Writers optimization of an age section these don't even work in PyPRP 1.6. As you can see looking at the below image they obviously do work, & seem relatively simple to set up. In this example a plane is set to wire frame with the blue arrow y-axis rotated to face in the required direction. Then it is has a ( string, type, occluder ) property added to it. The important bit seems to be the size of the mesh, with a small plane you have to get close to it for it to start working. With a very large plane it works from some distance away. Turning the camera some way to the side breaks it.
But what is it really doing; I draw your attention to the tree stump on the left of the two images. Notice on the lower image how the end grain is missing; this is because the the tree stump is partly crossing the occluder mesh. If I move the mesh slightly the the whole of the tree stump disappears. Now the question here is, is the occluder stopping the mesh from being rendered or is it effecting only the materials. The trouble with Vis regions is you have to connect every object to it. With an occluder you can easily wipe out half an age; or at least anything not in your field of view. So it may have it's uses in age building.
Attachments
Occluder-ON-OFF.jpg
Occluder-ON-OFF.jpg (232.62 KiB) Viewed 4911 times
melvin
 
Posts: 48
Joined: Sun May 05, 2013 12:23 pm

Re: Occluders don't work, or do they

Postby Maroonroon » Tue Dec 26, 2023 10:10 am

The only thing I know about occluders is (https://guildofwriters.org/wiki/Perform ... #Occluders):

Note: Occluders are not currently available in PyPRP 1.6
An occluder is a special type of mesh that stops object behind it from being rendered. Occluders take time for the engine to calculate, so they should be large, very simple meshes with few faces. Occluders can be single-sided or double-sided. Occluders are not a replacement for visRegions. Use visRegions wisely, and occluders should be for special cases.

Examples of Occluders in Uru:

  • The volcano in the Cleft occludes the terrain behind it.
  • The desert floor occludes the rooms in the Cleft.
  • Zandi's trailer occludes the brushes and rocks.
  • Some giant occluders hide the two main sections of Eder Kemo from each other

Use an occluder if you already have a large solid object that will block viewing of objects behind it. Note that occluders are "all or nothing": you cannot specify which objects to occlude. Everything behind the occluder will not be rendered.

But yeah, I saw no tutorials about them... :(
User avatar
Maroonroon
 
Posts: 219
Joined: Sun Jul 06, 2014 5:03 pm
Location: France

Re: Occluders don't work, or do they

Postby melvin » Sun Jun 09, 2024 2:00 am

This is not about occluders, but I'll post this here as it's knowledge learned but there is no tutorial on the subjects. I will add a few things from time to time starting with these odd subjects; both of which use a geometry node. They work in blender by using the F10 Render button plus an active camera, or using cycles mode in more advance versions of blender. It did not work in Uru when tested, but I don't know if this is due to the Plasma engine not using the geometry node or PyPRP just not exporting it. Still it's some interesting information.
The first image shows a mesh with one material, but it has a different textures on the reverse side. The two sided option is active on the faces of the mesh. Beside it is the node setup.The second image shows two textures mixed together without baking them using a colour layer. By switching the colour1 & colour2 wires on the node setup you can change the result.
Attachments
Face & Back materials.png
Face & Back materials
Face & Back materials.png (174.27 KiB) Viewed 2664 times
Mixing materials.png
Mixing materials
Mixing materials.png (331.78 KiB) Viewed 2664 times
melvin
 
Posts: 48
Joined: Sun May 05, 2013 12:23 pm

Re: Occluders don't work, or do they

Postby melvin » Tue Jun 11, 2024 11:54 am

Another useful thing with no tutorial is creating height maps using materials to deform a mesh; usually a subdivided plane. Newer versions of blender have a built in terrain generator, but the same thing can be done using older versions. The active material on an object in edit mode can be used to add Noise to a a mesh. Using a combination of the noise & smooth buttons things like mountains can be easily created. Black & white image are the best things to use; this also includes blenders build in generated materials like clouds & stucci. Different materials can be used; these can also be rotated 90 degrees. Use the scale z to reduce the height if necessary & then continue with the noise & smooth buttons.
Textures can also be Baked & UV mapped on to the terrain. Note in the below image how the mipmap button is turned off on the first texture; which is the baked result of the next three textures. One of them is black & white & must have the STENCIL & NO RGB buttons pressed in the material panel. Also note that beside the BAKE button TEXTURES are selected & the CLEAR button is off.
A final problem that height maps create is a bit of mesh face stretching; not always an issue,but can be easily fixed in edit mode by firstly using the subdivide smooth option. Then using the poly reducer found in the edit mode script options. Image C shows the result with the TRIANGULATE button pressed & image D is the result without it. You can use the convert quads to triangles after the poly reduction just as a final touch.
Attachments
Height Landscape.png
Height Landscape.png (436.74 KiB) Viewed 2585 times
Stretching Fix.png
Stretching Fix.png (923.16 KiB) Viewed 2585 times
melvin
 
Posts: 48
Joined: Sun May 05, 2013 12:23 pm

Re: Occluders don't work, or do they

Postby melvin » Fri Jun 14, 2024 9:50 am

Another thing I have been experimenting with is planting objects, like grass & small rocks, on to a surface using the particle emitter. But before I explain this process, I would like to point out that blender has a powerful build in tool for snapping objects to a mesh surface. As in the below image use the shown settings; then hold the ctrl key while moving a cube, & it will track the surface aligning itself with the z-axis of each target face on the plane. If the cube snaps to the underside then add some scale & rotation to the plane. By switching off the align rotation setting the objects will track the terrain while remaining vertical like the cylinders in the image. The last thing to note is the centre of the cube objects, which is close too but not exactly on the base face which in this case would also be deleted.
Attachments
Snapping Mode.png
Snapping Mode.png (145.67 KiB) Viewed 2453 times
melvin
 
Posts: 48
Joined: Sun May 05, 2013 12:23 pm

Re: Occluders don't work, or do they

Postby melvin » Fri Jun 14, 2024 9:55 am

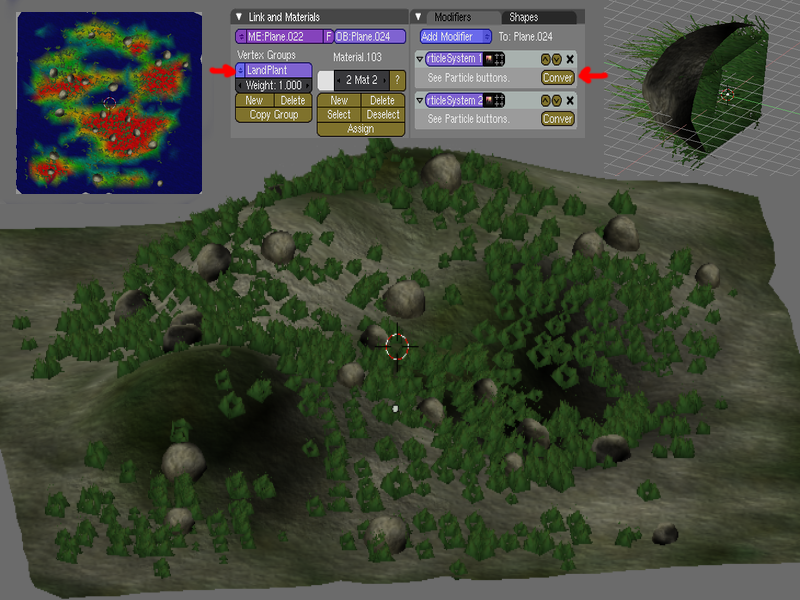
It is possible to plant small objects like bushes, grass & rocks on a landscape just as in ages like the Cleft or Ercana. The process is actually quite simple & is speeded up by using the weight paint. Objects like in the image below can be added in as little a five minutes. I've been doing this in Western Teledahn so I know it works. You can even make the objects fade at a distance using the texture filter just like in Cyans ages.
Firstly the ground plane will need to be subdivided a reasonable amount of times as each face will emit a particle as an object. The vertices need to be selected & then added to a new group; this is important as it controls the weight paint. If you want to add different objects then use the copy group option & give them separate names. Now you will have two independent weights both using colours blue, green, yellow & red. These are strength colours & control how dense the objects are grouped together in any particular place. Blue is off & red is the maximum.
Next you need your objects as in the image below. Note the obvious that they are rotated 90 degrees along the local Y-axis, then notice the not so obvious; where their centres are located. Not just at the base of the objects but in the centre of that grid where the default cube is when you start blender. Once objects become particles you can move these & cause every particle on the plane to move or even explode from the scene.
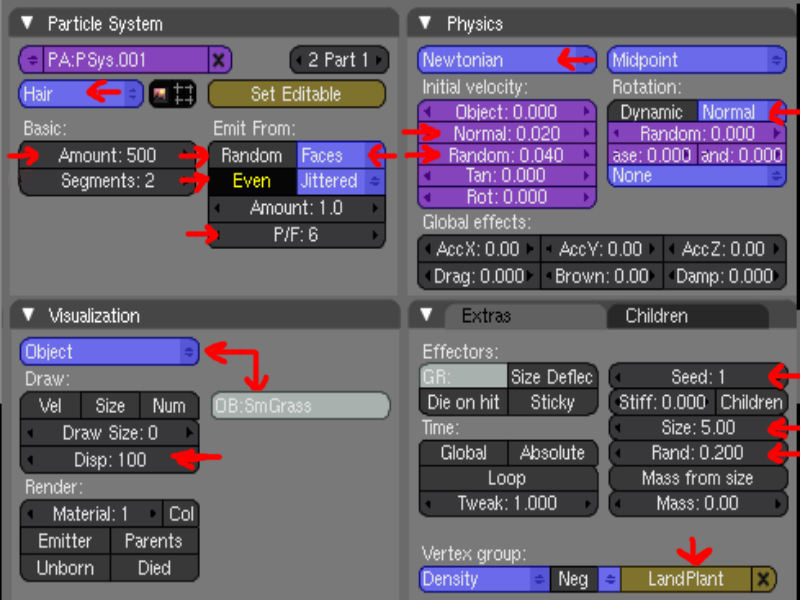
Now select the plane & add a new particle system; you will need more than one system if you are planting different types of objects. Lots of new options appear but don't panic, you only need a few of these, & most of them can be set to a default & left alone.
Particle System window, set it to emit Hair, Faces & Jittered then press the Even button. The Amount depends on the objects, a high value which may be in the thousands for grass, & a low value for rocks, about 30. The last option is P/F default zero or automatic. The higher the value the more the particle objects will try to avoid faces that are already emitting a particle. Left at zero objects of various sizes will be generated on top of each other; like small rocks hiding inside larger rocks.
Visualization window need to be set to object; & then the name of the object to be displayed as a particle. The Disp setting should be set to the max of 100 although you can alter it.
Physics window set to Newtorian & Midpoint, also set the rotation to Normal; this will make each object align itself with the ground face following it's Z-axis. You can alter the ground mesh in edit mode & the objects will adjust to their new locations once you exit edit mode. Lastly is the initial velocity Normal & Random settings. These work with the Extra window Size & Random settings so you will have to alter them both to see your particle objects. The Random button will randomly alter the objects sizes; making rocks & grass look more realistic. When you start to scale your objects up to size, it will soon become apparent how important the ground mesh subdivision size matters. If you have small subdivided planes & large rocks they will overlap, but with grass this may be what you want in certain areas, so some thought is needed.
Lastly the Extra setting, not including the Size & Rand values. The Seed just alters the output & can be experimented with to get the best result. The most important setting here is the Vertex group Density setting. This must be set to the vertex group or groups you created earlier & connects each particle system with their own weight paints. Once you have connected this you will need to go into weight paint mode, clear it with blue & the add a bit of paint where you want your objects to appear; the stronger the colour the denser the groups of objects.
Once you are happy with what you have created you will need to convert the particles into separate objects. Make sure the ground mesh does not need to be altered, as the objects will not follow it once the particle emitter is turned off. It has to be turned off, along with the vertex groups, to get your age to export. First press then Conv button found where blender adds Modifiers; the particles have now disappeared from you ground mesh. Next delete the Modifiers & your vertex groups from the ground plane. Now go to the objects in the centre of the blender default cube grid. Set to single use the Data Blocks, Materials & Texture; if you don't do this strange things may happen when you duplicate these particle objects. It's also a good idea to remove the date blocks off the new objects created with the convert button. The easiest way to do this is to select one object, then select, linked, material which should select all the objects. Then join them all the together.
That's it!, your age should now export Bare in mind this is not an exact science. In edit mode you should remove the doubles from the vertices just in case. Also you should inspect objects in wire frame mode where no doubt you will find places where smaller objects have been created inside larger ones. Also note that you will be adding allot of vertices to your ages overall vertices count. You can go a bit crazy with the grass as long as you use the texture filter to control the render distance; about 0.8 rather than the default 1.0.
Attachments
Planting Grass.png
Planting Grass.png (696.42 KiB) Viewed 2453 times
Particle Settings.png
Particle Settings.png (184.05 KiB) Viewed 2453 times
melvin
 
Posts: 48
Joined: Sun May 05, 2013 12:23 pm

Re: Occluders don't work, or do they

Postby melvin » Fri Jun 28, 2024 11:04 pm

Lighting an age; a complicated & some what confusing subject. Having made a few ages I realise there are some things that I did't understand; experience counts a bit with age building. The main thing was the importance of using light groups where materials have the SHADELESS button turned off. They were used to create the shadow effects on the enhanced version of Greenwood Cottage. It is also playing an important part in Western Teledahn. I've been busy with other things of late, but my attention is focused on it again; progress is going well.
First the basics. Sun lamps light the whole age, where as ordinary lamps light an area with a controllable distance & spot lights do the same except they aim in a certain direction. Next is the materials applied to objects to give them a texture. Like with any painting lightings is used by the artist to bring a picture or textures to life, & can make or break a work of art. To achieve this the most important things are colour layers & the SHADELESS button in the material panel. When this button is pressed the object will not be effected by any light source. But you still need to apply shade in the form of a colour layer. To do this an object & the lamps that light it must be moved into a separate layer in blender, then all the SHADELESS buttons on all the materials must be switched off then add a new colour layer. To complete the process go into vertex paint mode & click on the object once; which should smooth the result. Most of the time it will look ok, but you may need to touch it up by hand here & there using black or white. Lastly you need to turn all the SHADELESS buttons back on & replace them into their old layers. This can be a time consuming process if you have hundreds of objects.
Shadeless material settings can be used in outside areas lit by a sun lamp, or in inside areas lit by ordinary or spot lamps. The lamps will still be exported but they do nothing except light up your avatar & a few objects. To get things like specularity to work you will need to turn SHADELESS buttons off. It's all about PC performance & optimising an age. The next important thing you can use is a soft volume region to control the sun lamp; so your ordinary lamps light up the inside areas the way they are supposed too.
Now the material panel in the image below in the first four boxes; lots of buttons & sliders. Some of them are turned on as default; Radio, Traceable, Shadbuf, Shadow & Bias. These can be turned off & the specularity slider if not needed. The Shadbuf button is the only one that does anything & can be used on an object like a kickable so it can have a dynamic shadow like your avatar that alters as the object moves around. This should only be used on a few select items as it will be a great performance hit to most computers. The next important thing is the Ambience slider; default 0.50. To understand this slider you will need to look at the bottom two boxes which are from a lamp. There are the obvious settings, distance, energy & Ray Shadow; this is for the avatar shadow & any objects using the Shadbuf button. But there is also a not so obvious button called NO DIFFUSE; default off. When this button is switched on it becomes clearer how lights & lamps work.
Look at the second image, which shows a spot light projecting a black & white texture creating a glitter ball light effect rotating around a room. But look what happens when the NO DIFFUSE is turned on in the image beside it. The railing shadow is just faked in with a flat mesh & a black blend texture. The room is still lit by the colour layers but the defuse light from the spot lamp has gone. You can see that lights on objects that use Shadeless materials work by using a combination of things.
The last two images show an artistic views of a large mushroom; with the light coming from two different directions. Like with a painting the light brings the scene to life. All the objects have the SHADELESS button turned off & a flat dark,but not black, colour layer applied to them. The sun lamp is animated & revolves around the age so the lighting in the scene changes in real time. As an added touch the fog setting is used to fade the objects in the distance; which also have a blue tint on the colour layer on the tops of the mountains.
Which brings us to the third image showing a night view of Palamary Bay, which also shows the use a fog setting to fade the distance. It also shows improved water, a reflection of the ship & some specularity on the glass in the imager. The sky dome is now a starfield that animates down through the blue sky fog to create night time view. In this age all of the outside objects have the SHADELESS button turned off & the sun lamp has a colour animation. You may also notice that the lamp beams are not visible. This is because I am in fly mode; the beams now fade in & out with the day & night cycle.
The improvements seen here are partly due to the use of light groups. The colour layers now work the way they should work, using only the sun lamp, & are not effected by the other 55 lamps that light the inside areas. There are in fact two sun lamps one controlling the animation with an energy setting of zero. The other is creating the avatar shadow & adding some specularity. It's a strange setup due to the animation. Switching the NO DIFFUSE button on has no effect, & the Ambience on shadeless objects is at Zero. The extra lamps added in the age to control the shadows have also been removed.
When a lamp is made into a group it will turn green. Objects do not need to be added to the group, but materials will; as seen in the first image. The Exclusive button should also be pressed. In conclusion the lamp controls the diffuse light & the colour layer controls the shadow. The material Ambience controls the strength of both of these; results will depend on what type of lamp is used & how many other lamps are in the age & if light groups are used.
Attachments
Material Panel.png
Material Panel.png (334.36 KiB) Viewed 1835 times
Diffuse Lighting.jpg
Diffuse Lighting.jpg (363.98 KiB) Viewed 1835 times
Night View.jpg
Night View.jpg (130.32 KiB) Viewed 1835 times
melvin
 
Posts: 48
Joined: Sun May 05, 2013 12:23 pm


Return to Building

Who is online

Users browsing this forum: No registered users and 0 guests