Ok, count me in - I would love to help to make Korman a really awesome tool.
I wish you all the power of endurance which is needed to bring this project to a full-featured working toolset. Writing such a toolset is a LOT of work, I hope everybody of the designers is aware of this, and is appreciating your engagement as highly as I do.
Tsar Hoikas wrote:[..]Namely, materials. One of the problems in PyPRP1 and Blender 2.4 (aside from AlcScript) is that what you see in the blender render might be totally different from what you see in Uru. We would like to fix that by using the Blender 2.6 nodes system to export materials.[..]
It depends if materials look different. If you are using shadeless materials, which are not affected by any light source (neither in Blender nor in Plasma), textured materials look quite similar. I assume you already know that, just mentioning to better explain why shaded materials in contrast are difficult.
The visual outcome of shaded materials - which should be used rarely in an Age by the way - does not only depend of the material's settings itself, but also (and highly dependent) on the used light sources. This lies in the nature of shaded materials. If a surface appears bright, medium-lit, or dark, not only depends on the distance and lighting angle (face normal to light beam direction), but additionally on the behavior of the light source. That is, how it's falloff is defined. Inverse linear, logarithmic, cubic, whatever. And the maximum distance where virtual photons have effect, if applicable. So you only have a chance to make Blender renders compareable to the outcome in Plasma if you can ensure that light source behaviour is absolutely identical in Blender and Plasma.
Regarding the material settings itself, I'm wondering why using material nodes would help to better control the similarity in both worlds. Maybe you could provide an example, or explain a bit more?
Although I've used Blender (2.49b and 2.6x) for years now, I'm not really familiar with material nodes. Like denDwaler said, I'll have to learn about it more to be able to give valuable hints. I know what they are, how they work, and how they are supposted to be used in theory, but did not use them really often - because I was stuck to PyPRP1. I generally love the idea of them, you can easily create mathematical relations just by putting inputs, operations and filters and by simply dragging lines between them. I wish I had such a tool for daily real-life work with calculations, much more intuitive than Excel for example.
It could be great if we can use it in Age building, but I'm not sure if we really benefit from this. For setting multiply for example, to combine a basic face texture with the object's lightmap. Or for defining the specularity, hardness, or diffuse color of an object, instead of defining this at the material itself. How does this give an advantage?
This is how I use materials in Age building with Blender 2.49, and what I use them for:
- An objects gets as many material slot assigned as the belonging object would have different materials.
For example, a table consists of legs (e.g. steel), a frame (maybe wood) and the plate (could be glass) - so I would use three materials.
Those material slots are mainly used as a container for holding the different needed textures.
- In each material slot, I mostly put in two textures: One basic texture, plus a lightmap in multiply mode.
Some slots hold more than two textures, in cases where a material animation is needed, or where I want to blend between the basic underlying texture and a dirt map;
for example, the table legs get a stencil on their lower side to blend some grass or dirt/rust in. In this case, the material uses 4 textures: Basic steel, stencil, rust, lightmap.
The table frame may hold 4 textures as well, a different basic wood texture, a different stencil, some dirt, same lightmap.
The glass plate uses either a transparent texture only, or an additional environment map to simulate reflections. No lightmap here.
- For ground planes, there may be much more texture layers, e.g. basic grass (repeated often), coarse variation overlay (repeated less often), stencil, gravel, lightmap, cloudmap, and eventually additional layers.
- In case of a shadeless material, I use the Amb slider to control the overall brightness in the Age. Additional brightness can be added by using the Emit slider. In some rare cases, the color tone of the material can be adjusted additionally by the material color. Unfortunately you can't see the effect of this in the Blender GLSL shader viewport. Is this a case where using nodes would help?
- For shaded materials, I additionally use diffuse intensity (called Ref(lection) in 2.49), specular intensity, specular color and hardness. This does have an effect in the GLSL viewport, but comes out completely different in the Age.
If the goal is to speed up Age building, I'm not sure that using the Blender renderer will be of help. You are talking about the internal renderer, or Cycles, by the way?
Example: I'm currently working on Relativity. Exporting the Age as it is currently takes about 1-2 minutes. Firing up Uru and entering the Age takes about additional 1-2 minutes. So the overall time to "go have a look" is about 3 minutes. Starting a render of the current scene in contrast takes about 7-8 minutes (in 2.67), even if I render at only 50% size. That's not faster; I assume we would need a high-speed multi-core PC to have an advantage. The best way would be to get the GLSL shaders viewport do the job just in time - if possible.
If you plan to use automated lightmap baking, there should be an option to chose which lamps to export with the Age, which to use for baking - or which to use for both (shared).
This can already be used in the 2.49/PyPRP combination.
For lamps, I normally set up them this way:
1. I create lamps for lighting my avatar and set rendering OFF for them (the image icon in the outliner) - this way they are only exported to URU but are not used for lighmap baking
2. I create additional lamps for lighmap-baking and add a property "String, page_num, 12345" to them - this way they get not exported to URU, but are use for baking.
This way, you have a lot of control over your lighing of the Age. This is essential because the lamps behave so different in URU and Blender - especially because there's no such thing as "environment lighting" in Plasma, as far as I know. So you HAVE to add extra lamps to lighten up your avatar from below as well - which in contrary will look bad for all other objects.
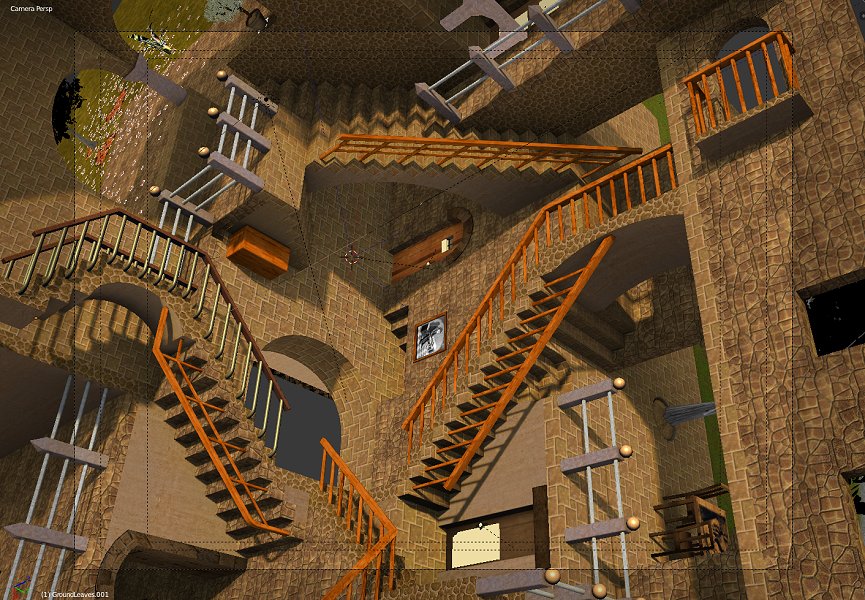
Finally, here are some examples of how materials look different in a Render, in GLSL, and in Plasma. You'll notice that shadeless materials (the walls) don't look very different at all, mostly the shaded (real-time lighting) objects are a problem, like the balls on the banisters and some banister metal. And transparent materials (the leaves) are a special chapter.
Relativity Render:
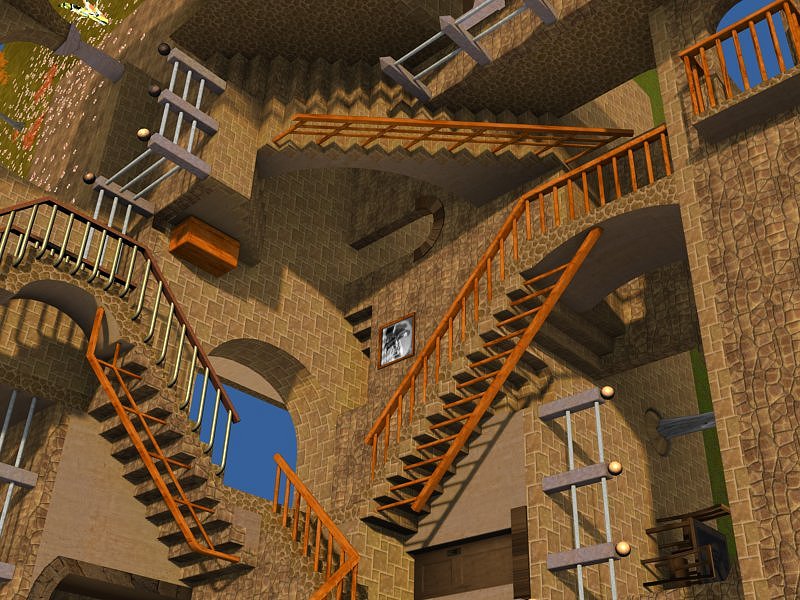
- Relativity-Render.jpg (139.34 KiB) Viewed 4054 times
Relativity GLSL shader (viewport):
- Relativity-GLSL.jpg (183.52 KiB) Viewed 4054 times
Relativity URU Plasma:
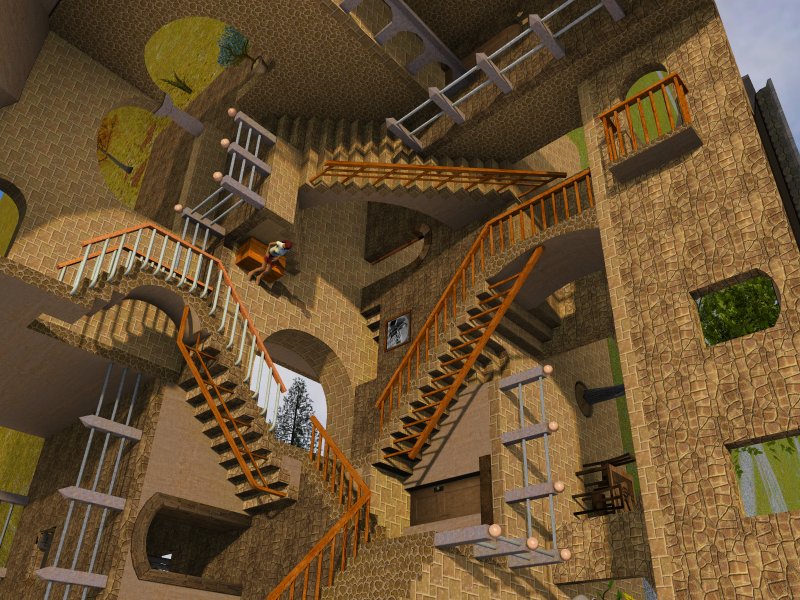
- Relativity-Plasma.jpg (147.76 KiB) Viewed 4054 times