Animated texture going white...?

If you feel like you're up to the challenge of building your own Ages in Blender or 3ds Max, this is the place for you!

Animated texture going white...?

Postby Kierra » Fri Aug 01, 2008 11:31 am

Heya,

My first attempt at an animated texture failed as I suspected it would (I suck at this stuff), or at least, I think it did, because I can't tell if its animated or not.

The texture turned completely white. :?

The texture is a transparent texture, so I'm not sure if thats the issue or whatever. I used This tutorial, which was a bit vague on some points so I had to do some guess work and figure some things out on my own. As a result I don't know if I've done something wrong along the way...who knows.

Does anyone have a guess as to what would turn my (attempted) animated texture white?

~Kia
User avatar
Kierra
 
Posts: 371
Joined: Sat Sep 29, 2007 12:05 am
Location: 311 miles West of Cyan. roughly.

Re: Animated texture going white...?

Postby Jojon » Fri Aug 01, 2008 2:43 pm

Sounds like the layer has no texture... I take it it was visible before you added the animation?

There was a similar trouble a bit earlier, when one of the layers (I half-recall it was the animated one) was a stencil, but I believe that got sorted out...


Maybe it would help whomever might have an answer, if you add a screenshot of the texture tabs and specify which bits in the tutorial were unclear (for future revision, by the original author, or anyone else).
Jojon
 
Posts: 1116
Joined: Sun Sep 30, 2007 5:49 am

Re: Animated texture going white...?

Postby Kierra » Fri Aug 01, 2008 3:05 pm

Yes, the texture was visible before I added the animation.

Since I don't know what a stencil is, I don't think my layer is a stencil....

The sections of the tutorial that were unclear for me was..well, pretty much the whole thing. The tutorial didn't say anything about what window you needed to be in the button panel (turns out it was shading, F5), and then it didn't say you needed the texture tab, and to create a new texture to be able to see the map input tab.

The tutorial shows a picture, and lists some basic instructions, but I had to play around with it for quite some time to figure out what the tutorial meant and how to make my screen look like the picture in the tutorial.

If others already knew how to do this sort of stuff, I certainly didn't, and have no idea where I was supposed to learn it in the first place. :?

So anyway, this is what my screen looks like in blender:

Image

Image

and this is what it looks like in Uru with the above settings:

Image

~Kia
User avatar
Kierra
 
Posts: 371
Joined: Sat Sep 29, 2007 12:05 am
Location: 311 miles West of Cyan. roughly.

Re: Animated texture going white...?

Postby Marcello » Fri Aug 01, 2008 3:11 pm

Ok, not sure what is wrong, but here is how I do it. I was writing this while you responded with your screenshots. Just start over and see if my explanation helps ya. If it does let me know and I'll see if I can clarify the one in the wiki.

1. texture the object like you would normally do and make sure it's visible in UrU
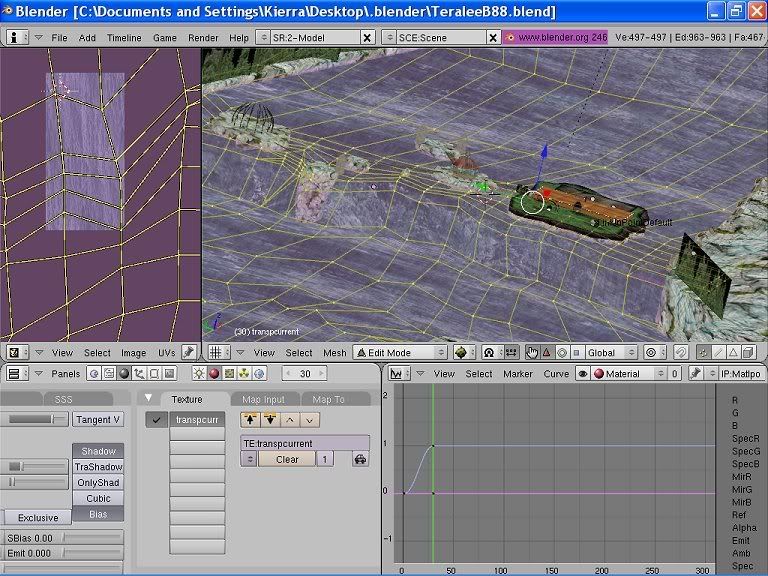
2. add the IPO curve window to your blender GUI (split a window somewhere and choose IPO from the dropdown)
3. select the object you want to animate a texture one
4. in the IPO window look for the dropdown box. It will probably say Object. Select Material
5. to the left of the dropdown enter the nr of the layer you want to animate. If you have multiple texture layers in your material 0 is the top one, 1 the next, etc.
6. right of that there is a dropdown simular to other "name" fields in Blender. Name your animation there. Like all stuff in Blender you can reuse your IPO curve for other objects by selecting curves here you made earlier.
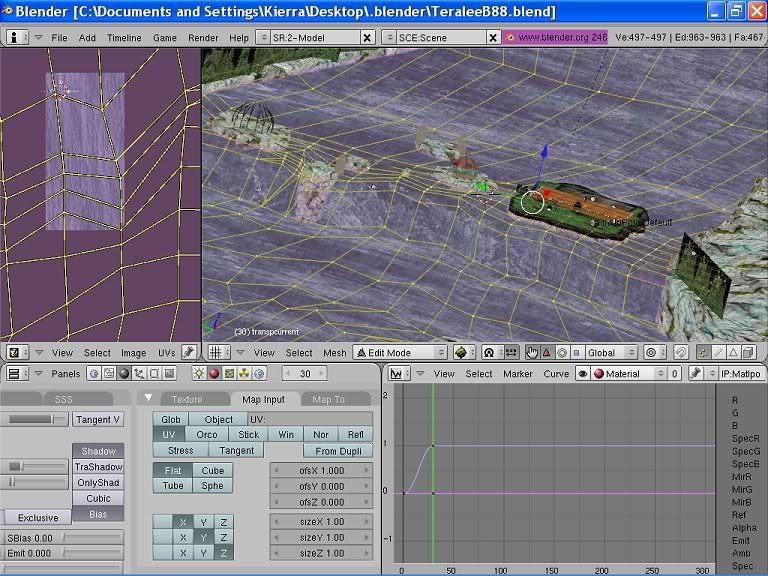
7. click the Materials button (grey sphere) and go to the Map Input tab
8. to the right of the material buttons (red sphere, world, etc.) you can set the frame number you want to add a keyframe to.

Now... workflow from here can be repeated for as many key frames as you want.

9. enter 1 in the frame field
10. set ofs settings in the Map Input tab (ofsX, ofsY and/or ofsZ) to your starting position. Likely 0
11. keep your mouse arrow over this window in Blender and press I
12. you will see a popup menu with Insert Key in bold at the top. Choose ofs
13. now set the next frame in the frame field, for instance 50
14. now add the offset you want the texture to have at 50 (again ofsX, ofxY and/or ofsZ).
15. press I again and choose ofs
16. etc.

You will see the keyframes in the IPO windows for every keyframe you make.

Now what I do for animated texture flows is only enter the first and last frame. In the example above the animation will automatically loop back to frame 1 after frame 50. Any variation in speed and movement I try to achieve by deforming my mesh. Make sure you have some vertices you can drag to change the shap of the animation. Works great with water and lava and stuff.

I also work in whole steps only to make sure the animation is seamless and the texture doesn't shock. For instance I will try:

frame 1: y offset 0
frame 50: y offset -2

If -2 is too slow and -3 to fast I will variate the frame number. For instance to get inbetween -2 and -3 I will set -4 (whole number again) at frame 75. Which will be appr. -2.6667 at frame 50. Since I worked in whole steps I know for sure that the texture goes all way round. In this case it hase gone round 4 times before frame 75 and start neatly at the same spot again. No shocking textures there!!! If I had entered 2.5 or 2.6667 at frame 50 the texture would have jumped when going from 50 to 1 to bridge the gap from 0.6667 to a whole turn around.

That's all there is to it. Works every time for me and I never had problems. Since you won't be working with many keyframes for stuff like waterflow, lava, etc. the easiest solution to change an animation is to just delete an IPO curve if you aren't happy with it and start over.

Kierra maybe you missed something or didn't texture this particular object. Or maybe you animated another layer in your material.

Hope something in this post helps :)
User avatar
Marcello
 
Posts: 374
Joined: Sun Nov 04, 2007 8:59 am
Location: Haarlem, The Netherlands

Re: Animated texture going white...?

Postby Kierra » Fri Aug 01, 2008 7:05 pm

Still white :cry:

The texture is fine until I try to animate it. I don't get it. I'm either the worlds stupidest Writer, or the worlds most unlucky Writer. Or you know, both.

~Kia
User avatar
Kierra
 
Posts: 371
Joined: Sat Sep 29, 2007 12:05 am
Location: 311 miles West of Cyan. roughly.

Re: Animated texture going white...?

Postby Lontahv » Fri Aug 01, 2008 7:25 pm

Try deleting your '<UruFolder>/sav/<your avatar's name in hex>/current/<your-fan-agename with some hex at the end>.sav'

You can just kinda guess your hex name if you have only a few avatars.
Currently getting some ink on my hands over at the Guild Of Ink-Makers (PyPRP2).
User avatar
Lontahv
Councilor of Artistic Direction
 
Posts: 1331
Joined: Wed Oct 03, 2007 2:09 pm

Re: Animated texture going white...?

Postby Kierra » Fri Aug 01, 2008 7:29 pm

K, then what?

~Kia
User avatar
Kierra
 
Posts: 371
Joined: Sat Sep 29, 2007 12:05 am
Location: 311 miles West of Cyan. roughly.

Re: Animated texture going white...?

Postby Lontahv » Fri Aug 01, 2008 7:33 pm

Try going to your age again and see if it's fixed. :)
Currently getting some ink on my hands over at the Guild Of Ink-Makers (PyPRP2).
User avatar
Lontahv
Councilor of Artistic Direction
 
Posts: 1331
Joined: Wed Oct 03, 2007 2:09 pm

Re: Animated texture going white...?

Postby Kierra » Fri Aug 01, 2008 7:36 pm

That would be a big nope

~Kia
User avatar
Kierra
 
Posts: 371
Joined: Sat Sep 29, 2007 12:05 am
Location: 311 miles West of Cyan. roughly.

Re: Animated texture going white...?

Postby Robert The Rebuilder » Fri Aug 01, 2008 7:56 pm

Wow - what a weird coincidence, Kierra! I'm going through that tutorial at the moment as well. I did get it to work for a simple polygon; now I'm trying to get it to work for a multi-material/textured object.

One thing to check is whether the IPO curve is for the OfsX/Y/Z values. IN order to check, move your mouse cursor over to the right side of the IPO panel (where all those words are listed), hold down the middle mouse button, and move upwards to move the list upwards. The OfsX/Y/Z values should be white with colored boxes next to them. If not, that means that it didn't make an offset key.
Can we rebuild it? Yes, we can - here's how.

MOULagain KI# 1299

Myst Movie coming soon - spread the word!
User avatar
Robert The Rebuilder
 
Posts: 1383
Joined: Sat Sep 29, 2007 7:24 am
Location: Virginia, US

Next

Return to Building

Who is online

Users browsing this forum: No registered users and 5 guests