This is great......
Now if I can just figure out how to use it......hhehehehe.....
I don't suppose there's a tutorial laying around about how to use PlasmaShop's features is there?
Edit:
Okay, didn't want to make a triple post, but wanted to let people know what I found out:
If you want to make your own font using PlasmaShop, this is what you'll need to do:
Just like in Dustin's old tutorial on Alcugs, you'll need to sit down with some white paper and a black marker. You'll need to write out the letters, numbers and charactors. But before you do that, do this first.
Open up PlasmaShop and open the orange Fonts folder. Find the file, Sam-30.p2f and open it up. As you can see, you see all the letters, numbers and other charactors in a grid like pattern in the other window.
Now go up to your menu and click on "Fonts" then click on "Save Font Bitmap" and save the bmp file somewhere.
Next, open up your favorite paint program and open this BMP file up. You'll see that it is a very skinny, and very long bmp!
Specifically, for this one it is 55 X 6175 pixels big!
Here is a pic that is part of what you should see: (this one is actually from Sharper's font)

Okay, now you can see how you're going to have to write out your letters, numbers, etc. I used several sheets, writing next to the left hand edge to keep them straight. What is also important is the order that you make your charactors, and also why we opened this bmp file up, to see what order they need to be in.
Now, this is not strictly important to do, but it will make your life easier down the road here.
Once you've made your charactors, you need to scan them. Then using your favorite paint program, you need to make a new bmp that has the same dimensions as the bmp file from the font file. In this case it was 55 x 6175 (please note, that Sam-30 is Sam's hand writing, font size 30. Should be obvious now what those numbers mean by now. For each font size, you'll have to open each one up and save the bmp, then take a look at it to see what the size is. For example, Sharper-18 is 22 x 2548 pixels big).
Then take your chractors you scanned and put them in the same order on your new image. Then save the file to something you'll know, like Andy-30 or whatever.
Now back to Plasma.
Normally you'd create a new font file. Problem is, I tried this, and nothing was working for me. Meaning I don't know how to create it from scratch, and PlasmaShop doesn't come with a manual.
So here is a work around. Call up Sam-30.p2f file again.
Then go up to Font in the menu, but this time click on Load Font Bitmap. Select your bmp you made.
Wow, now it looks like a mess, eh? That's okay, select one of the squares. It will highlite blue. Now look down in the bottom left hand cornor of your screen. You'll see something like "Char: 'C' " or some other charactor. In this case, the square I picked is suppose to have the Capital C in it.
Now that you know that, double click on that same square and a window will pop up:
Okay, now this can be a bit confusing, but keep with me, it confused the hell out of me at first, but then I got the hang of it, and it was easy:
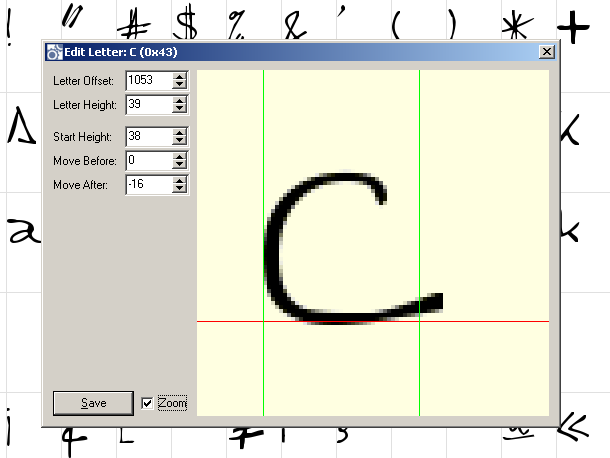
First Things first. Resize that window so you're okay looking at it. In the yellow box you should see a red line, and two green lines. You can use the box marked Zoom to zoom in and out.
Now, here is what the boxes mean:
Think of the area you see in the pic above as a window looking at your bmp picture. You are about to move that window up and down to the letter you need, and you are going to adjust the hight and width of that window.
Letter Offset positions the window up and down the bmp to where you need to be. You'll find it's easier to use your mouse on the yellow box and move it up and down. Try to get to the letter you need.
Okay, once you get there, you need to carefully move your letter up until the letter above it just disappears. That's important to do that first.
Next:
Letter Height is going to get rid of anything BELOW your letter. Us the arrow buttons (NOT YOUR MOUSE IN THE WINDOW!!!!) to adjust this. Adjust it to where the pixels of the letter below the one you want just dissappear.
Next:
Start Height will move your letter up and down. But notice when you do this you don't see the one above and below it! This is for how far up or down you letter will appear in your journals.
Move Before and Move After. These will move the green lines. You want to have the Before just at the begining of you letter, and the After just after your letter.
Okay, now click on the Save button and look at your box. You should see your letter looking great there!
Now do that for each and every box. I know, there are a lot of them.
Now that you have all that done, go up to File and click on Save As. You'll want to change the name to one that you'll be using like Trylon-30.p2f or something. That's it, other than making sure your new file is in your dat folder.
You know, the whole time I was trying to make this work, I kept moving things up down left and right, and I swear I heard Atrus: "Now move the slider a little more to the left......."