Page 2 of 2
Re: Wanted: Total Blender Beginners to Test Tutorials
Posted: Wed Jan 09, 2008 8:37 pm
by Vamp
Could be worse...
Could be a roomful of glowy crystals...

Re: Wanted: Total Blender Beginners to Test Tutorials
Posted: Wed Jan 09, 2008 8:45 pm
by Chacal
Oooooh look! Crystals!
Re: Wanted: Total Blender Beginners to Test Tutorials
Posted: Thu Jan 10, 2008 12:33 am
by Jennifer_P
Funny you guys should mention that...Like my new signature?

Welcome to the Crystal Signature Series! If you plan to write crystals into your Age and you don't want the Maintainers inspecting your Age to fall into a lava-filled crack which formed as a result of the crystal-caused contradiction you unknowingly wrote into your Age, then be sure not to miss a single installment of this thrilling series! It will discuss the common myths and misinformation which have been perpetuated about crystals and answer questions about crystal shapes, properties, and methods of formation. This series will be aired right here in this very signature. Questions or comments about crystals or the content of this series may be directed to:
the Crystal Corner. The Crystal Signature Series: Everyone else is reading it. Are YOU?
Re: Wanted: Total Blender Beginners to Test Tutorials
Posted: Thu Jan 10, 2008 5:42 pm
by Dovahn
Well, I think an, ahem, "girlish" tutorial is much easier to read than one written like a history textbook. Because I am a Blender beginner (but not 3D modeling beginner) I will certainly give these a try to get more used to the interface, and the bubbliness of the writing will serve to keep me entertained. (that's a good thing)

Re: Wanted: Total Blender Beginners to Test Tutorials
Posted: Fri Jan 11, 2008 2:35 pm
by Jennifer_P
Thanks, Dovahn; again, let me know if anything, anything at all, isn't sufficiently explained or confuses.
And I suppose that, everyone's opinion heard, I'll probably leave the bubbliness in then.

Welcome to the Crystal Signature Series! If you plan to write crystals into your Age and you don't want the Maintainers inspecting your Age to fall into a lava-filled crack which formed as a result of the crystal-caused contradiction you unknowingly wrote into your Age, then be sure not to miss a single installment of this thrilling series! It will discuss the common myths and misinformation which have been perpetuated about crystals and answer questions about crystal shapes, properties, and methods of formation. This series will be aired right here in this very signature. Questions or comments about crystals or the content of this series may be directed to:
the Crystal Corner. The Crystal Signature Series: Everyone else is reading it. Are YOU?
Re: Wanted: Total Blender Beginners to Test Tutorials
Posted: Fri Jan 11, 2008 2:55 pm
by Chacal
Add some cowbells and it's perfect.
Re: Wanted: Total Blender Beginners to Test Tutorials
Posted: Sat Jan 12, 2008 4:17 am
by Trylon
/me agrees with Dovahn - with the exception of me not being a blender beginner
Re: Wanted: Total Blender Beginners to Test Tutorials
Posted: Mon Jan 28, 2008 1:18 am
by Grogyan
I've nearly finished my little simple tutorial to model a ladder using some features of blender, its late so i'm not going to post all the images.
But if someone could give a quick run down and see if its simple enough, for a near newbie at Blender.
- Modeling a neat looking ladder for Uru Show Spoiler
In this tutorial you will learn about using the array modifier, bezier curves and bezier circles to make a great looking ladder for Uru.
The easiest way to model a ladder for this tutorial we will start with a new blend file.
So open Blender if you havn’t done so already.
With the cursor in 3d view window, press the “A†button on the keyboard twice, so that the box, the lamp and the camera are selected.
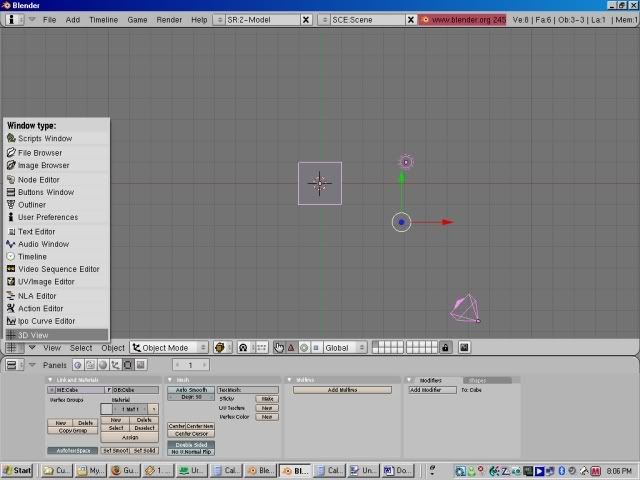
Press the “Delete†key to delete these objects.
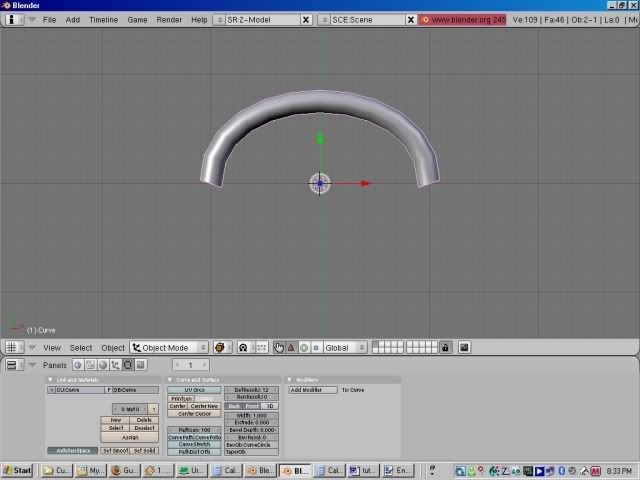
While still in the 3D view, tap the spacebar, and select from the menu Add -> Curve -> Bezier Curve.
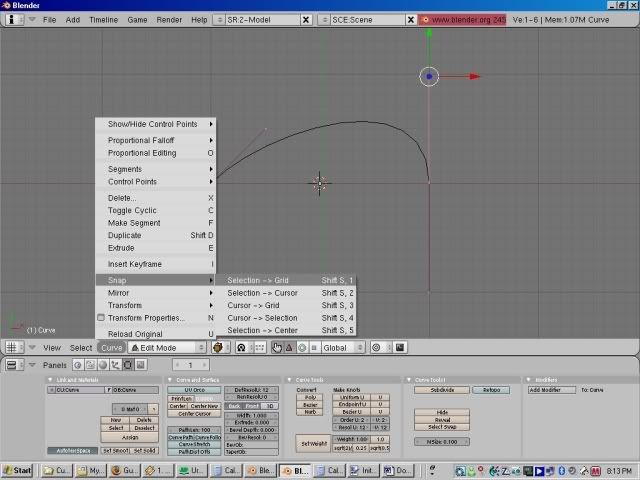
Right click the mouse button on the point on the axis where the Red and Green arrows point out from, this will select a “handleâ€.
Move the handle so it looks like this, use the menu to “Snap selection -> Gridâ€
Do the same for the other handle on the other side of the curve, and it should now look like this.
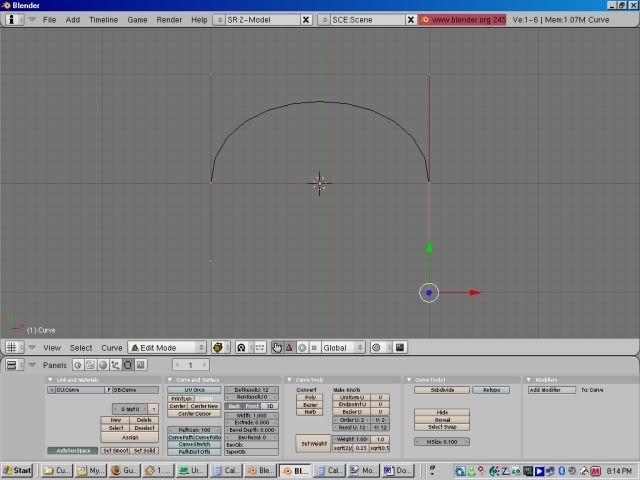
Press the “Tab†key on your keyboard, and you should now be in “Object modeâ€.
Tap the “Spacebar†key again and select “Add -> Curve -> Bezier Circleâ€
Press the “S†key on your keyboard, now type “0.1†on your keyboard, followed by pressing the “Enter†key, and you should now see this on your screen.
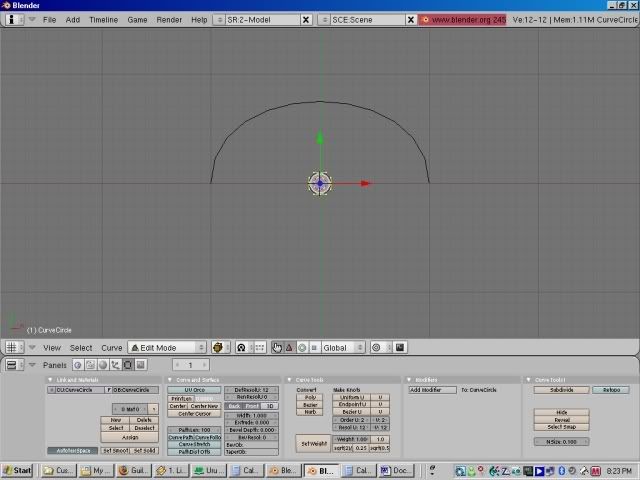
Look down towards the bottom left hand corner of the “3D view†window and you’ll see in white text, the name of the circle with a number in brackets “(1)â€, ignore this number, but remember or write down the name of the circle EXACTLY.
Press the “Tab†key to return to object mode.
Right click your mouse button on the curve you did earlier to highlight it.
Move your cursor down to the bottom panel.

You should see in the above picture that I have “Left clicked†the mouse button on the “BevOb:â€, from here, you need to type in EXACTLY the name of the circle, that I asked you to do before.
Press the “Enter†key.
Your “3D view†should now look like this.
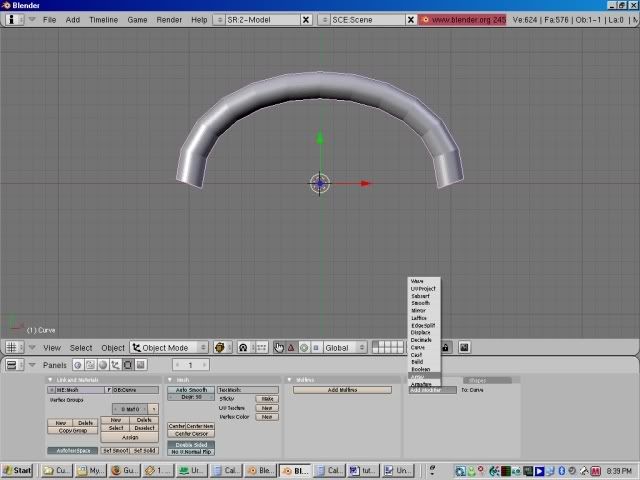
Move your mouse cursor back to the “3D view†and hold down the “ALT†key and press the “C†key some times seen as “ALT+C†in other tutorials.
Use the mouse to select “Convert to†and click “Meshâ€
Right click your mouse button on the circle, and press the “Delete†key and select “Erase selected object(s)â€.
Right click your mouse button on the tube in the “3D viewâ€.
Move your mouse down to the bottom and click “Add modifierâ€, now select “Arrayâ€.
Below where it says “Relative Offset†left click on X and type “0†and press the “Enter†key.
Below that, left click on Z and type “5†and press Enter.
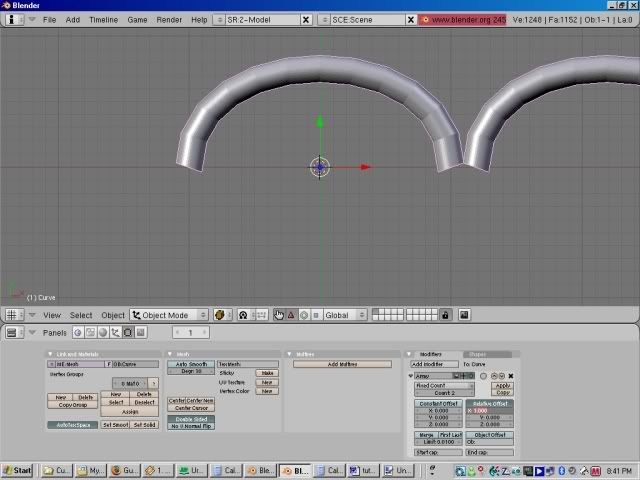
Above the text in that same small panel that says, “Constant Offset†you should see the text that says, “Countâ€, left click on that text.
By entering a value here, you’ll make Blender duplicate a series of rungs identical to the one you have just made, and because you have set a value for Z, as in Z-axis, the “Count†duplicates that spacing as well.
I have found, that to work out the number of rungs to enter here in the “Count†box works out to be,
Take the number of loops the avatar’s hands change places on a ladder normally,
Multiply by 2
Add 6 to that number then,
Subtract 1 (its important to subtract 1, as when the avatar climbs onto the top floor, that is also counted as a rung).
(The minimum number of loops is 2)
(Also it’s a good idea to write down the number of loops, as this will be needed later)
You should now have an odd number.
Enter this number in the “Count†box in Blender, and press “Enterâ€.
Move your mouse to the “3D view†and while holding down the “middle mouse button†you will see your newly made ladder for Uru.
Take a final look at it, to make sure its what you are wanting.
Move your mouse to the bottom of the screen.
Look Above the “Relative offset†button, and you should see another button that says “Applyâ€, click this now to set this set of rungs as a ladder.
It still looks a bit out of place, so move your mouse cursor to the left, and click on the button that says, “Set Smoothâ€.
I’ll leave shading and applying of textures to the ladder for another tutorial.
The last bit to do, which you can do if you're doing this ladder for an Age, is that this ladder needs some "Collision" so that the avatar won't appear to have magical powers.
To do that, in the bottom pane, you'll see an icon that looks a lot like Pac-Man, but purple, click on that.
Now where it says "Bounds", click on that.
Left click where it says "Box", and select from the menu "Static TriangleMesh".
Thats it, now the ladder has collision, but its not climbable at this stage, that will be for another tutorial.
If you feel comfortable now, try changing the values all over Blender to see what happens, just be sure that you do this in a new blender file, separate from your Age.
If you want the curve at the beginning to be smoother, simply press the “Tab†key while in the “3D view†to switch to “Edit mode†then tap the “A†key twice so that all the vertices turn yellow.
Press the “W†key to bring up a menu, and select the top option “Subdivideâ€.
Re: Wanted: Total Blender Beginners to Test Tutorials
Posted: Tue Jan 29, 2008 9:15 pm
by Grogyan