Problems with shadows

If you feel like you're up to the challenge of building your own Ages in Blender or 3ds Max, this is the place for you!

Re: Problems with shadows

Postby Karkadann » Sat Sep 22, 2012 7:08 pm

Paradox wrote:Either bake the shadows into a lightmap on your terrain, or save the shadows as their own transparent texture and apply it as a decal plane just over the ground.


Never could figure out what those where, but using the shadow features in standard lights I managed to get shadows but they look a bit odd.

here is the max render pic
Show Spoiler

and here is the KI pic
Show Spoiler


any idea what Im doing wrong?
I Don't Have A Cell Phone, I have Freedom!
User avatar
Karkadann
 
Posts: 1224
Joined: Sun Aug 02, 2009 10:04 am
Location: Earth

Re: Problems with shadows

Postby Christopher » Sun Sep 23, 2012 2:44 am

You should either use the Render>Lightmap Component from the Plasma Plugin (There is a tutorial from Andy) or you use the "Render To Texture" feature from 3ds Max. If you use the second one you can render a Shadowmap which you can apply as a new Layer to your texture.

Christopher

EDIT: I think the last Method is the better one, cause it uses lesser esources I think...
User avatar
Christopher
 
Posts: 276
Joined: Mon Jul 19, 2010 3:25 am

Re: Problems with shadows

Postby Karkadann » Sun Sep 23, 2012 8:39 pm

the light map worked great for the Heel & Slaughter Stones (the ones in the pic above) it turned out just like the max render pic but when I included the Blue stones, the inner Blue stones and the Trilithon Stones to the shadows for the standard light representing the Solstice that im using to produce shadows, the Shadows started to freak out on me It looks even crazier with the Lintel and the Sarsen Stone's
check it out, I think the shadows have been drinking

Show Spoiler
I Don't Have A Cell Phone, I have Freedom!
User avatar
Karkadann
 
Posts: 1224
Joined: Sun Aug 02, 2009 10:04 am
Location: Earth

Re: Problems with shadows

Postby Christopher » Mon Sep 24, 2012 1:48 am

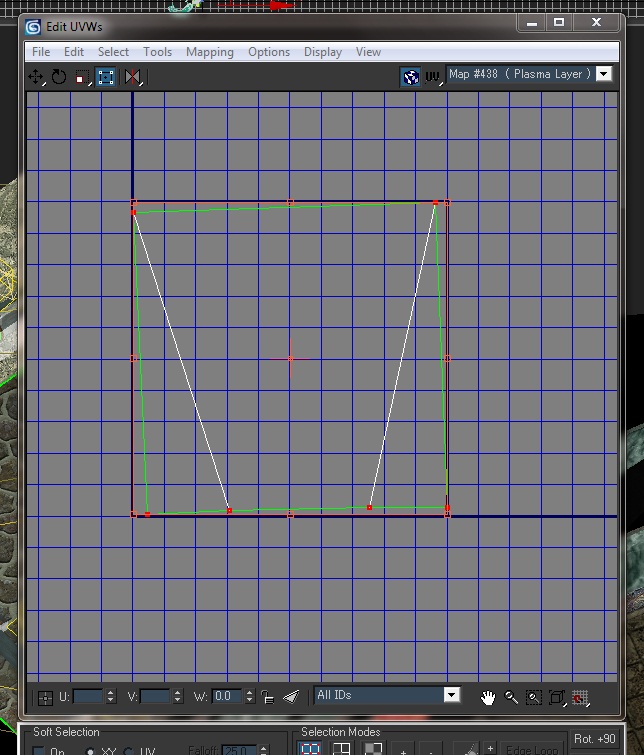
I think either your UV channel is broken or the resolution of your lightmap is to low. In the first case take a look if the UV-Map is in the marked square like in this picture:
Show Spoiler


Christopher
User avatar
Christopher
 
Posts: 276
Joined: Mon Jul 19, 2010 3:25 am

Re: Problems with shadows

Postby Karkadann » Mon Sep 24, 2012 11:16 am

Wow thanks It worked wonderfully It was the UV map
now all I need is to work out a few details, and stuff

Show Spoiler
I Don't Have A Cell Phone, I have Freedom!
User avatar
Karkadann
 
Posts: 1224
Joined: Sun Aug 02, 2009 10:04 am
Location: Earth

Re: Problems with shadows

Postby Christian Walther » Tue Sep 25, 2012 8:57 am

Cool! A little off-topic, but since you’ve been asking for tips on how to improve the looks of your ages: The grass texture in these pictures looks very repetitive. I would run it through a high-pass filter to reduce the repetitive patterns. If you’re unsure how to do that, I can explain in more detail, please ask. Tiling textures (unless they are supposed to look tiled, of course) should not have any frequency components near the tiling frequency, only a DC component (overall color) plus high-frequency detail. You could also use vertex colors and/or another, larger texture (maybe using the same image) to add some variation on a larger scale than the tiling.
Christian Walther
 
Posts: 443
Joined: Sun Jun 08, 2008 3:10 am
Location: Switzerland

Re: Problems with shadows

Postby Karkadann » Tue Sep 25, 2012 9:37 am

Im asking, please help. That is a problem I have had in several of my ages (some unpublished) the only way if been able to get around it, is with seamless texture.

A way around the repetitive tiling issue would be a be a big help to Me, and others who frequent this site for helpfull hint
I Don't Have A Cell Phone, I have Freedom!
User avatar
Karkadann
 
Posts: 1224
Joined: Sun Aug 02, 2009 10:04 am
Location: Earth

Re: Problems with shadows

Postby Wamduskasapa » Tue Sep 25, 2012 9:59 am

Hey Karkadann
If you wish some tileable grass textures, here are some from my age you can use

Show Spoiler
Computer = MotherBoard MSI X99S GAMING 7 - Intel I7-6950X
Dual MSI GeForce GTX 1080
64GB Kingston HyperX DDR4 Predator Memory
Dual Samsung 1TB SSD Pro - Dual Seagate 4TB SSHD
Excelvan 5.25" Multi-Function Media Dashboard
User avatar
Wamduskasapa
 
Posts: 943
Joined: Fri Apr 30, 2010 6:56 am

Re: Problems with shadows

Postby Christopher » Tue Sep 25, 2012 12:00 pm

Christian Walther wrote:I would run it through a high-pass filter to reduce the repetitive patterns. If you’re unsure how to do that, I can explain in more detail, please ask.


I am not exactly sure, what a high-pass filter is. Does it mean that you take different Grass textures in combination with stencils? It would be great if you could explain that in more detail.

Christopher
User avatar
Christopher
 
Posts: 276
Joined: Mon Jul 19, 2010 3:25 am

Re: Problems with shadows

Postby Christian Walther » Tue Sep 25, 2012 2:00 pm

Alright. What graphics software are you using? I’m going to assume Photoshop or Gimp, for others you’re on your own to adapt the instructions. None of the versions of Photoshop and Gimp I have come with a DC-preserving high-pass filter, but it can be replicated by hand with a bit of work. For Gimp I have also written a script that automates it: highpassdc.py. It belongs in ~/.gimp-*/plugin-ins/ (no idea where that is on Windows, or if it works there at all) and then appears in the Filters > Generic menu as High Pass with DC.

A high-pass filter (the terminology here comes from signal processing) is a filter that preserves (lets pass) high-frequency components, i.e. fine details, but removes (filters out) low-frequency components, i.e. overall color and broad variations. This is the opposite of blurring, which removes details but preserves broad variations. Blurring is a low-pass filter.

The basic idea is that you first blur the image sufficiently that all the detail you want to preserve is gone, but the tiling repetition that you want to get rid of is still present. Then you subtract that blurred image from the original image. Because that also removes the overall color, you then have to add that back. Matters are complicated by the fact that color values are limited to 0..1 (or 0..255), but the subtraction can yield negative values in the intermediate result, so you have to jump through some hoops to represent those as well.

It’s also a bit more complicated in Photoshop because it doesn’t have clear names like “add” or “subtract” for its layer compositing modes, but vague terms like “linear dodge” that I assume come from photography jargon and I have to experiment every time again to find out what exactly they do… “linear dodge” is “add”, “linear burn” is “subtract the inverse” (there doesn’t seem to be a simple “subtract”, you have to invert the subtrahend manually before). So, in Photoshop, “subtract A from B” in the following instructions means “put A on top of B, invert it, set its compositing mode to ‘linear burn’, and merge down”. In Gimp, it means “put A on top of B, set its compositing mode to ‘subtract’, and merge down”.

  1. Start with your original picture in a layer called “original”. To preserve the seamless tiling, enlarge the canvas to 3 times the size and fill it with a 3x3 tiling of the original image.
  2. Duplicate layer “original” as “blurred” and blur it until all the detail you want to preserve is gone, but the tiling repetition that you want to get rid of is still present. You probably need to experiment to see what blur radius gives the best result.
  3. Duplicate both original and blurred and subtract blurred from original. Let the result be “pos”.
  4. Duplicate original and blurred again and subtract original from blurred. Let the result be “neg”.
  5. Duplicate original as “avg” and fill it with its average color (Photoshop has an “average” filter in the “blur” menu, in Gimp you can read the average from the histogram).
  6. Add pos to avg.
  7. Subtract neg from the result.

As an alternative to the blurring-and-subtracting, you can use the built-in “high-pass” filter, which results in the high-pass result added to 50% gray, but to get the average color back in, you still need to subtract that 50% gray and add the average color, which is about the same amount of work as the above.
Christian Walther
 
Posts: 443
Joined: Sun Jun 08, 2008 3:10 am
Location: Switzerland

PreviousNext

Return to Building

Who is online

Users browsing this forum: No registered users and 5 guests

cron