Ages; Textures and Skies

If you feel like you're up to the challenge of building your own Ages in Blender or 3ds Max, this is the place for you!

Re: Ages; Textures and Skies

Postby Chacal » Mon Nov 26, 2007 9:45 pm

And then he meets a woman, disappears forever and no one can update the wiki anymore. :cry:
Chacal


"The weak can never forgive. Forgiveness is an attribute of the strong."
-- Mahatma Gandhi
User avatar
Chacal
 
Posts: 2515
Joined: Tue Nov 06, 2007 2:45 pm
Location: Quebec, Canada

Re: Ages; Textures and Skies

Postby Justintime9 » Tue Nov 27, 2007 1:27 pm

lol :D seriously tho, what do u think My problem was? I did the thingie with Edit:normals etc. but nothing appeared to happen (and I assumed that It wasn't something that I could acutally witness, I would see it in effect, in due course) waht was my Texture problem? i didn't use stencils, I used a UV texture, it should've worked... if u don't know what i did wrong, can u at least explain in your own words how u add textures (assuming u've made ages before)
User avatar
Justintime9
 
Posts: 1188
Joined: Sat Sep 29, 2007 5:37 am

Re: Ages; Textures and Skies

Postby Chacal » Tue Nov 27, 2007 2:50 pm

No idea, I'm a Blender newbie.
Chacal


"The weak can never forgive. Forgiveness is an attribute of the strong."
-- Mahatma Gandhi
User avatar
Chacal
 
Posts: 2515
Joined: Tue Nov 06, 2007 2:45 pm
Location: Quebec, Canada

Re: Ages; Textures and Skies

Postby Aloys » Tue Nov 27, 2007 4:20 pm

Okay, quick and dirty tutorial:
First make sure you have an 'UV/Image Editor' window open. Select your object, hit [F] this will turn on the 'UV Face select mode'. Now in your UV/Image window clik go to the menu Image>Open. Browse to the image you want to apply to your object. You're done. You can now hit F again to exit the UV mode. The texture will now work in Uru (just remember to have a unique material for this object).
Now this is not be the 'official' way of doing it, there are other ways (especially if you want to apply several textures to your objects,like a reflection, a detail texture etc..) but at least this one works 100%.

You will also need to do a proper UV mapping.. But for this I will redirect you to the 'Texturing' tutorial on the Alcugs Wiki.. ( here). I'm not how accurate it is in regards of the latest updates to PyPRP and Blender but it should at least give you a general idea.
User avatar
Aloys
 
Posts: 1968
Joined: Sun Oct 21, 2007 7:57 pm
Location: France (GMT +1)

Re: Ages; Textures and Skies

Postby Justintime9 » Tue Nov 27, 2007 6:06 pm

Ok, first of all, is the "UV Image editor window" the Textures window that u hav to select "Image" and your texture in? also, when I hit F while the object is selected, it says:

Make Faces
Auto
Make F Gon
Clear F Gon
Skin faces/Edge-loops

Is that waht's sposed to come up? if so, what do i click?
User avatar
Justintime9
 
Posts: 1188
Joined: Sat Sep 29, 2007 5:37 am

Re: Ages; Textures and Skies

Postby Chacal » Tue Nov 27, 2007 6:10 pm

Make sure you're in object mode, not edit mode.
Chacal


"The weak can never forgive. Forgiveness is an attribute of the strong."
-- Mahatma Gandhi
User avatar
Chacal
 
Posts: 2515
Joined: Tue Nov 06, 2007 2:45 pm
Location: Quebec, Canada

Re: Ages; Textures and Skies

Postby Kierra » Tue Nov 27, 2007 6:50 pm

ok, to make a UV/ image editor window, use the right mouse click to split the screen in half. then in your new window pane, click the "window type" button in the lower left corner and switch it to "UV/Image editor" (the one that looks like a woman's face).

your screen should look something like this:

Image

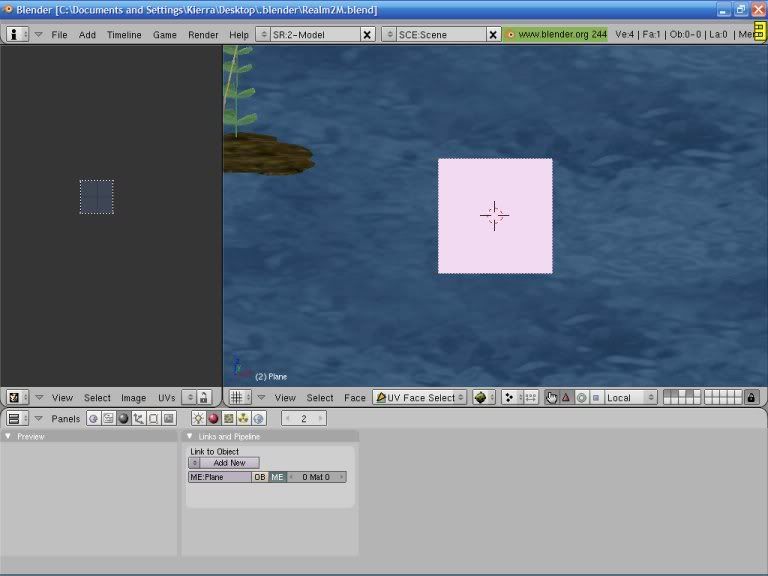
Select your object you want to texture, then hit the tab key to switch to Object mode if necessary. Then hit the F key. your object should change appearance, and the "UV/image editor" window should show a blank square.

Click the "image" menu in the UV/image editor window, then click on "open". Find the folder your image is in, and select it.

Now comes the fun of wrapping a 2D image around a 3D object. Move the mouse over to the 3D window pane and hit the U key. a list of options should show up:

UV calculation
-----
Unwrap
----
cube projection
cylinder from view
sphere from view
----
project from view
project from view (bounds)
----
reset
---


etc, etc. You'll have to play around with each of these options to see which style works best for your object.

~Kia
User avatar
Kierra
 
Posts: 371
Joined: Sat Sep 29, 2007 12:05 am
Location: 311 miles West of Cyan. roughly.

Re: Ages; Textures and Skies

Postby Justintime9 » Wed Nov 28, 2007 5:24 am

ah, thx :D o, and which option do i click for a Grid, and how do i know what's the right option for any object?
User avatar
Justintime9
 
Posts: 1188
Joined: Sat Sep 29, 2007 5:37 am

Re: Ages; Textures and Skies

Postby Justintime9 » Mon Dec 03, 2007 1:48 pm

Ok, I got the hang of that... but how do I flip the faces of the Sphere so I can hav a sky? I tried doing it, and nothing happened (and could u please re-type the steps) I noticed that when I add a texture, and hit U and choose an option, it either looks too stretched in the age, or too tiled... any way to make it look awesome like cyan's landscapes?
User avatar
Justintime9
 
Posts: 1188
Joined: Sat Sep 29, 2007 5:37 am

Re: Ages; Textures and Skies

Postby Justintime9 » Mon Dec 03, 2007 1:48 pm

Ok, I got the hang of that... but how do I flip the faces of the Sphere so I can hav a sky? I tried doing it, and nothing happened (and could u please re-type the steps) I noticed that when I add a texture, and hit U and choose an option, it either looks too stretched in the age, or too tiled... any way to make it look awesome like cyan's landscapes? O, and how do people make animated water and sky?
User avatar
Justintime9
 
Posts: 1188
Joined: Sat Sep 29, 2007 5:37 am

PreviousNext

Return to Building

Who is online

Users browsing this forum: No registered users and 1 guest