Editing Textures in Photoshop CS3

If you feel like you're up to the challenge of building your own Ages in Blender or 3ds Max, this is the place for you!

Re: Editing Textures in Photoshop CS3

Postby Atheni33 » Wed Sep 24, 2008 11:35 am

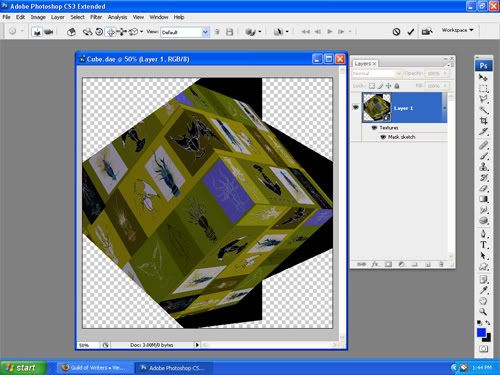
Success! I sent out an e-mail to a 3D artist who uses blender and edit textures in photoshop. Very helpful. He walked me through and showed me a easy way to bring blender files into Photoshop Extended. He exports it as a Collado 1.4 file. But you must first unpack the file (as D'lano stated earlier) photoshop can only read texture files in the same folder otherwise it will not show. Once you bring the file into photoshop it will look something like this. ( not sure why it's framed so oddly, could be my spot light.
Image

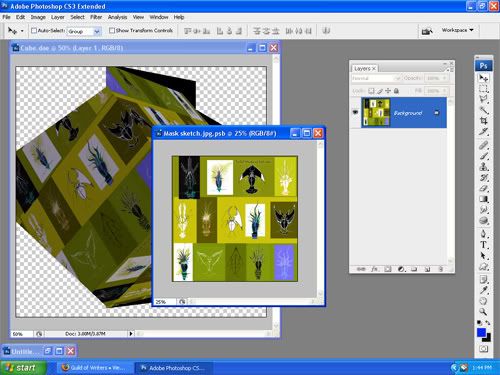
If you double click on the texture (' mask sketch') located in the layers, a separate editing window with the texture will come up. From there you can use any of the editing tools, filters, effects and such in photoshop.
Image

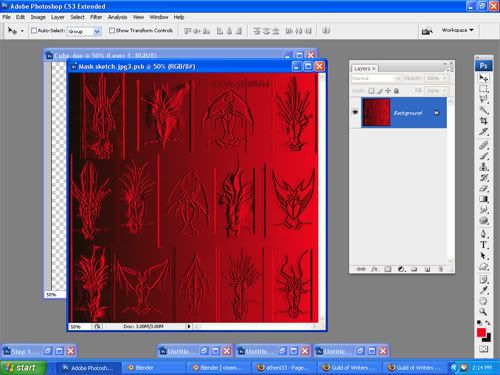
I used a Bas Relief filter which I thought was kind of cool, satisfied with the way it looked I closed the window (X) and a pop up window will prompt you if you want to save image as a jpeg.
Image

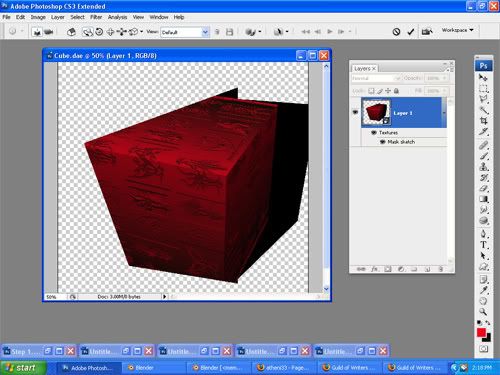
I hit ok and now I can see my edited texture on the cube.
Image

The only downfall with this method is you can't take the file back to blender ( I was told CS4 can) but you can save the edited texture as a jpg, tga, gif and UV wrap it in Blender, which should fit perfectly. Personally, I need to see how the texture looks on an object. I'll be creating my own textures and I need to use the brushes, palettes, filters that photoshop provides. It's just easier for me. :)
User avatar
Atheni33
 
Posts: 102
Joined: Sat Sep 29, 2007 5:46 am

Re: Editing Textures in Photoshop CS3

Postby Jojon » Wed Sep 24, 2008 2:52 pm

Eeeeehhh? I take it the cube is only a test object and that you will now be importing the actual masks, as opposed to an image of them, with their already mapped UVs..? (unless you're doing a single parallel projection)

Just thought that I'd throw in that with the scale/projection distortions that are inherent to UV-mapping of irregular surfaces, it never hurts to work on your textures at a really high resolution and then use a downsampled copy for the finished project, although one has to keep in mind how much detail will be lost in the downsampling process, or one might find oneself crying blood over all the elaborate work done for nothing. :9

Also, it may at times pay to lay out UVs for certain topology in a planned manner. If, for instance you'd want to line the eyes of one mask with some paint, arranging the UVs for the polygons around the eyes in question orthogonally, would mean you could draw the the outline with a simple rectangle of horizontal or vertical lines of pixels, without any jaggies showing on the model, even with a very low resolution texture, whereas a parallel projected UV-map might require a much larger image.

I have to assume you are very well familiar with these things, though, judging by the quality of your work. :)
Jojon
 
Posts: 1116
Joined: Sun Sep 30, 2007 5:49 am

Re: Editing Textures in Photoshop CS3

Postby Atheni33 » Wed Sep 24, 2008 5:58 pm

Eeeeehhh? I take it the cube is only a test object and that you will now be importing the actual masks, as opposed to an image of them, with their already mapped UVs..? (unless you're doing a single parallel projection)


Yeah I was just testing it out with a simple cube. :lol: I was just showing how a blender render object looks in Photoshop.

just thought that I'd throw in that with the scale/projection distortions that are inherent to UV-mapping of irregular surfaces, it never hurts to work on your textures at a really high resolution and then use a downsampled copy for the finished project, although one has to keep in mind how much detail will be lost in the downsampling process, or one might find oneself crying blood over all the elaborate work done for nothing. :9


I am open to any suggestion on how to make my work look better. :) I have recently been using high resolution textures and images. Particularly with my Shell project for Pahts but haven't had to many issues with downsampling...yet.

Also, it may at times pay to lay out UVs for certain topology in a planned manner. If, for instance you'd want to line the eyes of one mask with some paint, arranging the UVs for the polygons around the eyes in question orthogonally,would mean you could draw the the outline with a simple rectangle of horizontal or vertical lines of pixels, without any jaggies showing on the model, even with a very low resolution texture, whereas a parallel projected UV-map might require a much larger image.


This.. is a little advance for me. :? I can paint pretty much any thing in photoshop, however getting it to line up perfectly on a organic shape is something I knew i'll eventually have to deal with. Honestly I have no idea how to "arrange the UVs for the polygons orthogonally" or even "what parallel projection is". I guess i'll just cross that bridge when I come to it. 8-)
User avatar
Atheni33
 
Posts: 102
Joined: Sat Sep 29, 2007 5:46 am

Re: Editing Textures in Photoshop CS3

Postby Jojon » Fri Sep 26, 2008 3:49 pm

Slight problem is that you are actually standing with one foot on that bridge right now. :)

Parallel projection simply means that you look at your mask from one direction, let's say head on -- then you put your texture right down upon it, but you do not /wrap/ it around the mask, it's more like the canvas that your texture is painted upon, remains attached to its frame and passes right through the mask, like some ghost painting, leaving its colours behind on the mask, all the way through.
Another likening would be if your texture was actually a cube, rather than a rectangle. The painting is still 2D, but it extends through the depth of the cube, so that you could slice the cube into sheets and wind up several copies of the painting. Now imagine that you carved the mask out of that cube.

Humma, too many attempts to explain a simple concept makes for confusion... :P
Jojon
 
Posts: 1116
Joined: Sun Sep 30, 2007 5:49 am

Re: Editing Textures in Photoshop CS3

Postby Nalates » Fri Sep 26, 2008 4:44 pm

I've been learning Blender and UVMapping and importing things to Second Life. Whether it is for SL or Uru the UVMapping works the same. There is a good mapping tutorial here: http://blog.machinimatrix.org/2008/05/1 ... -textures/

Also, make sure you are using Blender 2.47 latest release candidate. The 2.46 (current stable release) has some UVMap bugs that will really confuse someone new to this (like me - I swear I did that, exactly, 3 times, it does not work... grrr -- stuff). Because of the bugs the behavior is inconsistent.

The trick is to get Blender to unwrap the faces to something you can use. You can tweak the unwrapped UVMap to suite your work. There are several Second Life tutorials out there showing how to do that. Make sure you pay close attention to what version of Blender they use. In 2.46 the UVMap commands changed and in 2.47 they work almost as advertised. Tutorials not updated can confuse you. There are vertices at each corner in the UVMap and those can be edited just as any vertices on a model/mesh. The tutorial above will give you some ideas. One can then use that map to apply the texture to the model. One can also, create a second UVMapped texture and have Blender bake the distorted texture for use in game. (Like AV faces that fit in a square image but are oddly stretched and coming out looking right when applied to the AV).

AndyLegate at GoMa has a tutorial that shown him editing the UVMap faces.
http://www.guildofmaintainers.org/Forum ... f=93&t=852

I don't paint in Blender because I prefer CS3 (what I have). If you are doing anything with transparency, you have to stick with Ping and TGA 24/32 bit files. JPG will lose the transparency. Blender will accept most in all but a few situations (SaveFacesUVLayout or whatever it is called, is one that exports only in TGA).

In CS3 I export to Ping (making SL clothes for the AV I usually have to match seams and have some transparent sections), load the image as a UVMap in Blender and display the 3D model in surface texture mod. I go back to CS3 edit and resave/export. In Blender there is a reload command (Atl-R or Image->reload)… I have a CS3 macro that does the save and export. So, this can happen really fast.
ImageNalates - Guild of Cartographers
Guild Apprentice: GoW, GoMa - Liaison: GoC to GoMe, GoC to SL (Nalates Urriah)
MO:UL 00 379 343 - Author: Uru Maps Tech Data
Nalates
 
Posts: 84
Joined: Wed Jan 30, 2008 9:59 am
Location: California

Re: Editing Textures in Photoshop CS3

Postby Atheni33 » Fri Sep 26, 2008 6:40 pm

Slight problem is that you are actually standing with one foot on that bridge right now. :)
:lol: True that.

Ah.. so parallel projection is a method of projection a 'placed' texture image outward in a fixed parallel path. Does that mean you can only see that image from the view it was placed? If I were to use PP for a cube I couldn't see the side because the side are not parallel to where the image was placed nor are they wrapped. The front is the area the texture was place and the back of the cube is where the image is hitting or being projected on, like a film projecting a movie onto a screen. Ah.. I can see the use of this method, if you have thousands of faces on a model but it's not necessary to view all sides of it, this could save render time because your not UV mapping the entire model. So for example If I were to render an elaborate city scape in the far horizon but it wasn't reachable (for some reason) I wouldn't have to UV map the entire city I could simple use parallel projection. :D


Natales wrote :Also, make sure you are using Blender 2.47 latest release candidate.


I Just got the 2.47 upgrade. I did notice a few options are either gone or moved. Very confusing for someone learning blender. I'm definately going to check out those tutorials you mention. I don't know why but I'm having a hard time getting blender to wrap things the way I want it. I can wrap something once, but if I want to adjust the position of my texture I have to go out of edit to object mode then back into edit mode to get my texture to render. :?

I don't paint in Blender because I prefer CS3 (what I have). If you are doing anything with transparency, you have to stick with Ping and TGA 24/32 bit files. JPG will lose the transparency. Blender will accept most in all but a few situations (SaveFacesUVLayout or whatever it is called, is one that exports only in TGA).


I usually use TGA/24, GIF or JPG. I'm going to have to try your workflow method between CS3 and blender. I thought I had a efficient method worked out when I discovered you could convert blender files and bring them into photoshop,(because I wanted to view the texture on the model) but it not working out the way I thought it would. It's a good method for simple objects but something more complex isn't much of an improvement.
User avatar
Atheni33
 
Posts: 102
Joined: Sat Sep 29, 2007 5:46 am

Re: Editing Textures in Photoshop CS3

Postby Jojon » Sat Sep 27, 2008 4:48 am

Atheni33 wrote:Ah.. so parallel projection is a method of projection a 'placed' texture image outward in a fixed parallel path.


Exactly!

Atheni33 wrote: Does that mean you can only see that image from the view it was placed? If I were to use PP for a cube I couldn't see the side because the side are not parallel to where the image was placed nor are they wrapped. The front is the area the texture was place and the back of the cube is where the image is hitting or being projected on, like a film projecting a movie onto a screen. Ah.. I can see the use of this method, if you have thousands of faces on a model but it's not necessary to view all sides of it, this could save render time because your not UV mapping the entire model. So for example If I were to render an elaborate city scape in the far horizon but it wasn't reachable (for some reason) I wouldn't have to UV map the entire city I could simple use parallel projection. :D


Not quite. It *is* like projecting a film, but it projects all the way *through* the cube, so you get the exact same image on the back of the cube as on the front, although if you walk around the cube and look, it will of course be mirrored, seing as now you are facing the camera, rather than sharing its vantage point, as you did at the front.
On the sides, which are perpendicular to the projector, you'll get the pixels at the outer edges (or more spcifically the coordinates on the texture that falls on the cube edge) streched out infinitly, resulting in parallel lines from front to back.

This is, of course, if you parallel project upon the entire cube all at once - nothing stops you from unwrapping each side separately.


Atheni33 wrote:I Just got the 2.47 upgrade. I did notice a few options are either gone or moved. Very confusing for someone learning blender. I'm definately going to check out those tutorials you mention. I don't know why but I'm having a hard time getting blender to wrap things the way I want it. I can wrap something once, but if I want to adjust the position of my texture I have to go out of edit to object mode then back into edit mode to get my texture to render.


Aah, this is where the bit Nal...Nalates ( ?, I have apparently MISread it as Natales up 'til now :P) mentioned, gets into play:
When you select a face in the 3D view, its corresponding projection (yes, I am doing the concept in reverse here), onto the texture, shows up in the UV/ImageEditor, where it can be moved around and transformed. Just like you can move a vertex around in the 3D view, you can move the corresponding vertex on the UVmap, in the UV/ImageEditor.

Set up your GUI so that you have both a 3D view showing the mask and a UV/Image editor showing the texture.

Now go into the menus of the UV/ImageEditor and make sure the item "UpdateAtomatically", under the "View" menu, is ticked -- this will make any changes you make to the mask's UVmap (in the UV/ImageEditor), show up immediately in the 3D view.

Select all faces in the 3D view.

Now all corresponding faces should appear as a mesh overlayed onto the texture in the UV/Image editor. (assuming you have previously unwrapped the object)

(Note that you need to select a texture, using the selector button in the UV/Image editor), or no texture will show up in the view. [the texture you select here is only for the editing, not the final output])

Now you can deform that mesh (which is the UVMap), selecting, moving, scaling, rotating, mirroring vertices in the UV/Image editor, in the precise same manner as you do with the model in the 3D view, only 2D.

If you want to pin the tip of a horn/wing/whatever on one mask to a certain texture pixel, maybe within a patch of enamel that has not yet peeled off; figure out which vertex in the UVmap is the same as the tip-of-the-horn vertex on the actual model, then grab it and move it to the pixel in question.

(I often do this by shift-deselect/reselecting a vertex in the 3D view and watch the UVMap for any vertex blinking out- and back in of existence.. :7)
Jojon
 
Posts: 1116
Joined: Sun Sep 30, 2007 5:49 am

Re: Editing Textures in Photoshop CS3

Postby Atheni33 » Sat Sep 27, 2008 1:17 pm

Aah, this is where the bit Nal...Nalates ( ?, I have apparently MISread it as Natales up 'til now :P) mentioned, gets into play:


Oops I've read your name a Natales all this time..my bad.


Now go into the menus of the UV/ImageEditor and make sure the item "UpdateAtomatically", under the "View" menu, is ticked -- this will make any changes you make to the mask's UVmap (in the UV/ImageEditor), show up immediately in the 3D view.


I've always had that item (Update Automatically) selected. When I move my mesh the (preview screen refreshes) which makes me think it's going to update but it never does. Everything else is loaded correctly. :?
User avatar
Atheni33
 
Posts: 102
Joined: Sat Sep 29, 2007 5:46 am

Previous

Return to Building

Who is online

Users browsing this forum: No registered users and 16 guests

cron